I’m sad to announce that I had to part ways with SiteGround and move this site to Cloudways!
Here’s my Cloudways hosting review for WordPress.
I’m sad because SiteGround is an awesome WordPress hosting – as you can find out from my SiteGround review – and I hosted this site with them since 2015.
I still have the WebStoked blog there, though. I didn’t leave with all my baggage. :D
If you are interested in why I left, read below, otherwise, skip directly to the migration part.
Why did I leave?
The primary reason was my budget, which is not that bright currently.
My GrowBig plan was about to expire, and renewing it would have been around $313.
But, as my traffic constantly grows, that plan wouldn’t have lasted more than several months until the resources would’ve started to run out.
So, the logical move would have been to get the GoGeek plan. But that is even more expensive, at nearly $500.
The secondary reason was that I was getting tired of shared hosting, which has limitations. And this applies to every host, not just SiteGround.
I’m also happy to get rid of cPanel, which, although very useful, is bloated and resource-hungry.
I would have bought SiteGround’s Cloud hosting, but it starts at $80/mo. And it still uses cPanel… I don’t know if you can opt to have it uninstalled or not.
So, I started doing some extensive research and I ended up on Cloudways, which offers cloud hosting using different providers, such as Digital Ocean, AWS, and several others.
Now, I’m using a DO2GB plan, which is $22/mo.
So, I’m on an optimized cloud server without limitations, and I only pay $22/mo for now.
I say I made a good choice and I’m happy with it!
Now, let’s get to the main topic!
I’ll show you, step by step, how to migrate your WordPress site to Cloudways.
I’ll also tell you several important things to do after the migration, as well as how to fix some potential issues.
There’s some good and useful stuff that you won’t see on any other tutorial.
If you didn’t purchase a Cloudways plan yet, use this link and add the coupon code THEMESKILLS to get 10% OFF for 3 months!
I. Setting Up Your Account and Server
Step 1
Create a Cloudways account.
You’ll have to verify your email and your phone number (you’ll receive a verification code). Make sure you do it.
Step 2
After your account is verified and good to go, you’ll end up here:
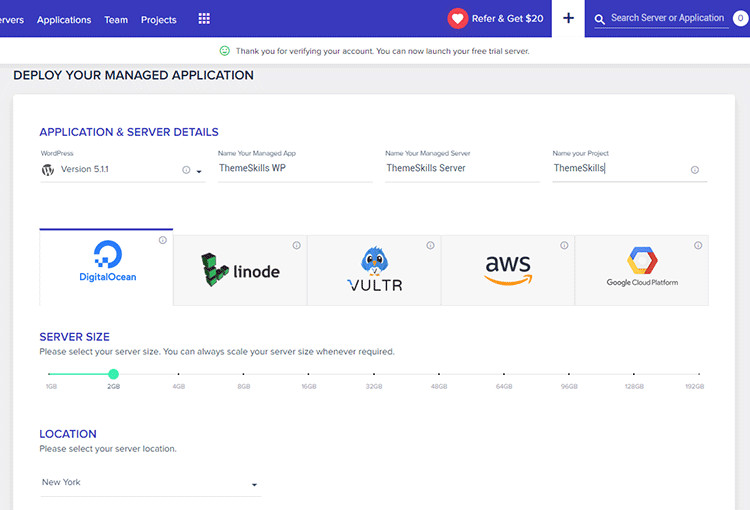
At Application & Server Details, choose WordPress, name your app, name your server, and name your project.
Then, select your provider. I’m using Digital Ocean.
At Server Size, choose the size (in RAM) of your server.
You’re probably wondering: “What about my CPU cores? Don’t I have to choose that as well?”.
No, because every size has its own number of CPU cores. The 2 GB size has 1 CPU core, the 4 GB size has 2 CPU cores, and so on.
You can see them in the pricing plans.
Lastly, choose your server location. The closest the server is to your audience, the better. The site will load faster.
Check Google Analytics to see your demographics
If you have Google Analytics implemented on your site, I recommend checking its statistics in Audience > Overview > Demographics > Country.
For example, if the majority of your audience comes from the U.S., pick a server from the U.S.
Check the coast as well.
For example, if the majority of the traffic comes from the East Coast, choose New York. If it comes from the West Coast, choose San Francisco.
If you get traffic from other places in the world as well, I recommend using a CDN (Content Delivery Network).
Cloudways offers CDN (based on MaxCDN, bought by StackPath) at $1 per 25GB.
A freemium alternative is Cloudflare.
Step 3
After you selected everything properly, click the Launch Now button and wait for the server to deploy.
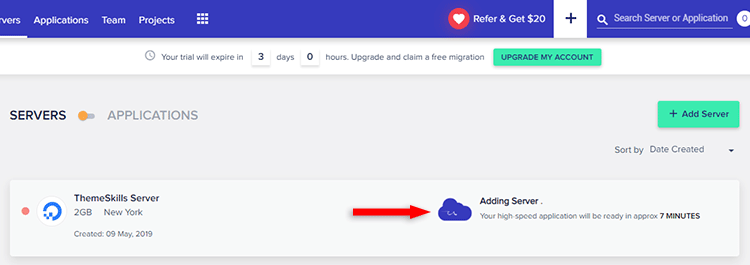
After several minutes, the server along with WordPress will be completely set up.
Step 4
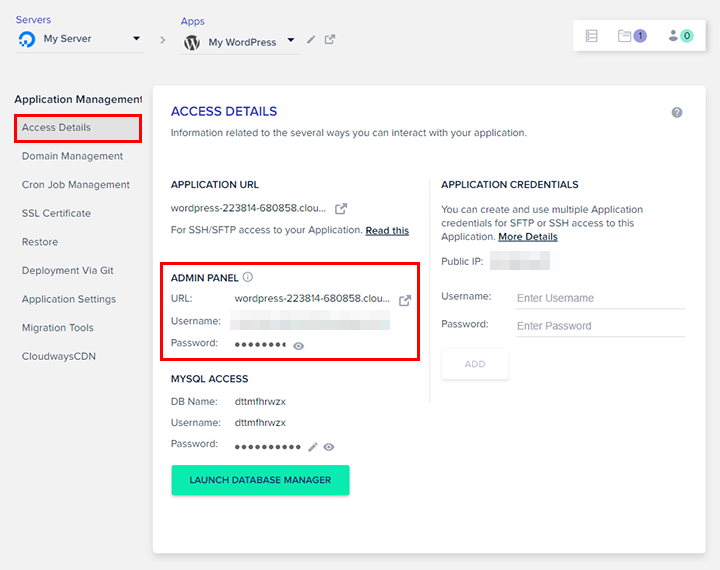
You can check if WordPress has been installed by going to Applications and clicking on your WordPress application’s name.

Then, in your Application Management, you’ll see your Access Details, with your temporary WordPress URL, username, and password.
If everything looks ok, proceed to the next step.
Before proceeding with the migration, it would be a good time to end the trial and upgrade the account by clicking on the Upgrade My Account button.
II. Migrating Your WordPress Website to Cloudways
I recommend creating a complete backup of your site before starting the migration process!
Cloudways offers to migrate your first website for free. So, if you want them to do it for you, contact the support. If not, continue reading the steps.
Step 1
Log in to your WordPress site on the old host and install the Cloudways WordPress Migrator plugin.
Here’s how to install a plugin in WordPress.
Step 2
Click on Cloudways Migrate in your dashboard’s sidebar. You’ll see this:
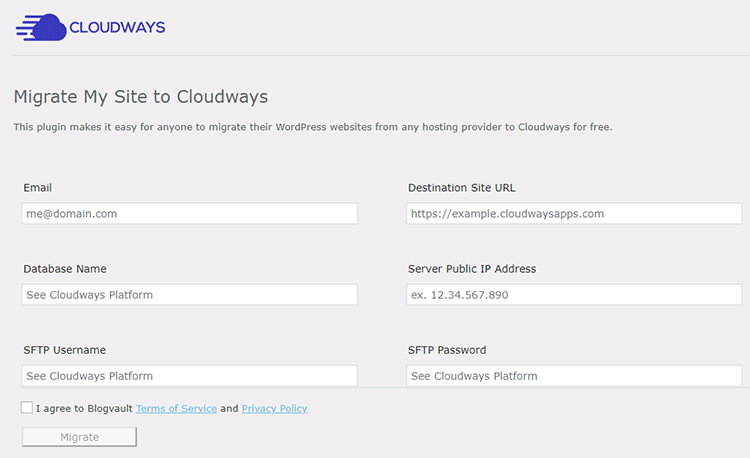
Everything you need to add there is in your Cloudways platform.
Add the same email you used to create your Cloudways account.
The Destination Site URL, Database Name, and Server Public IP Address can be copied from Applications > select your application > Application Management > Access Details.

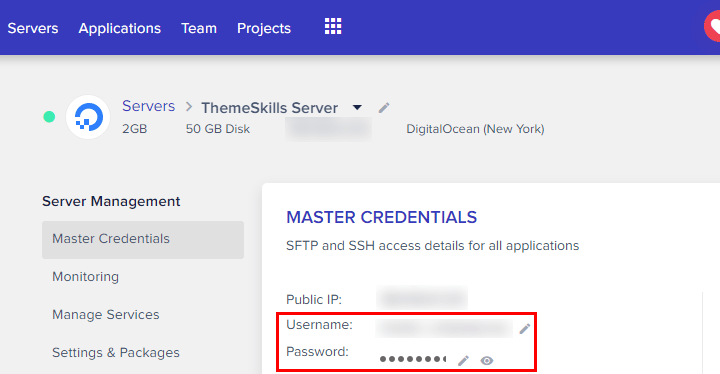
You can find the SFTP Username and SFTP Password in Servers > select your server > Server Management > Master Credentials.
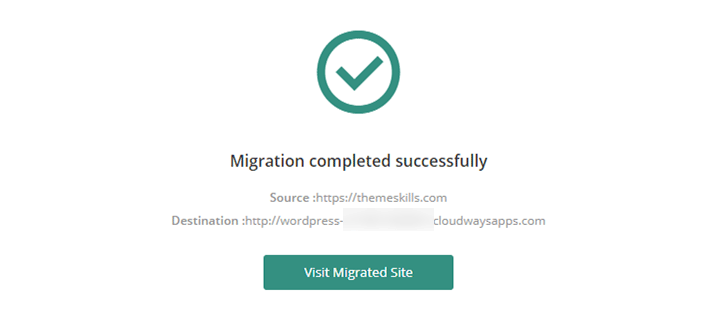
Step 3
Make sure you added the right information and click on the Migrate button to begin migrating your WordPress website to Cloudways.
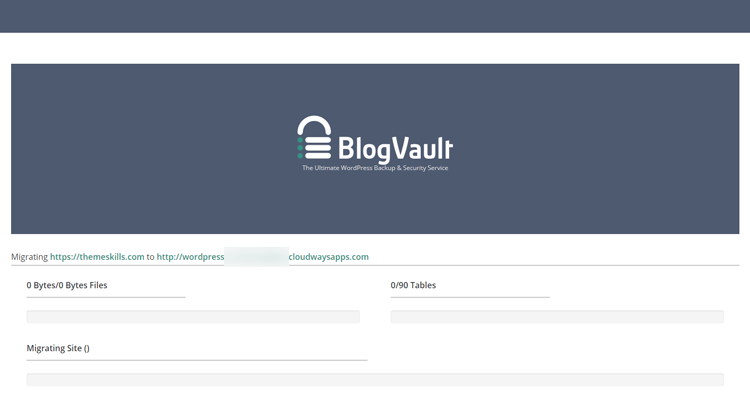
It can take a while, depending on how big your WordPress site is.
When it’s done, you’ll see this:
Step 4
Go to Servers > select your server > Server Management > Manage Services and clear the Varnish cache by clicking on Purge.

Step 5
Check your WordPress site on that temporary URL that you copied from Application Management > Access Details.
It should look fine.
If it doesn’t (e.g. some icons are not showing), don’t panic… yet :). I’ll cover some of the errors that might appear. Leave it like that for now.
III. Adding Your Domain to Cloudways
Step 1
Go to Servers, click on the www button, then select your application.
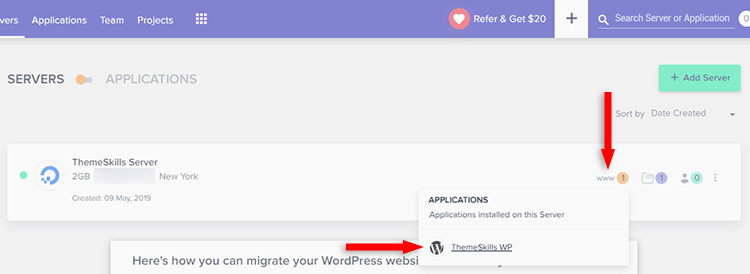
Step 2
Under Application Management, click on Domain Management and add your Primary Domain.
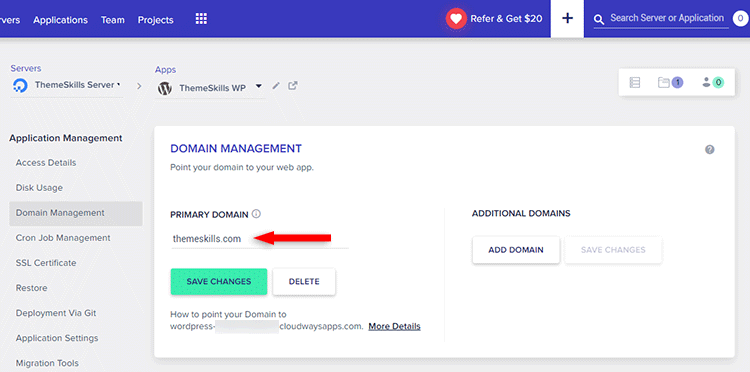
If you use a domain with www, then add the domain with www.
You can also add blog.example.com, in case you have something like that as your main domain.
Additional Domains are for domain aliases/subdomains, or in case you use WordPress Multisite.
If you have additional domains to add, then you’ll have to apply the next steps for them, too.
Click the Save Changes button.
Step 3 – If you are NOT using Cloudflare
Go to your domain registrar, where your domain is registered, and point the DNS to Cloudways.
Now, how exactly to do that depends from registrar to registrar.
Here are guides from Cloudways for GoDaddy, Namecheap, and Dreamhost.
Even if you’re using a different registrar, check one of those guides to get the idea of how to do it.
You’ll need to select an A record, add www as the Host, add your server’s IP (you can get it from Access Details, as shown above), and add a TTL value: Automatic or Custom (600 seconds).
I recommend contacting the registrar’s support, especially if you have subdomains, which can be more confusing. They should be nice enough to do it for you.
You can also contact Cloudways and tell them what’s your main domain, subdomains (if any), and they can give you the proper information to give to your registrar.
The DNS can take up to 24h to propagate, depending on the registrar, but it usually takes way less.
I don’t recommend doing anything until the DNS is fully propagated.
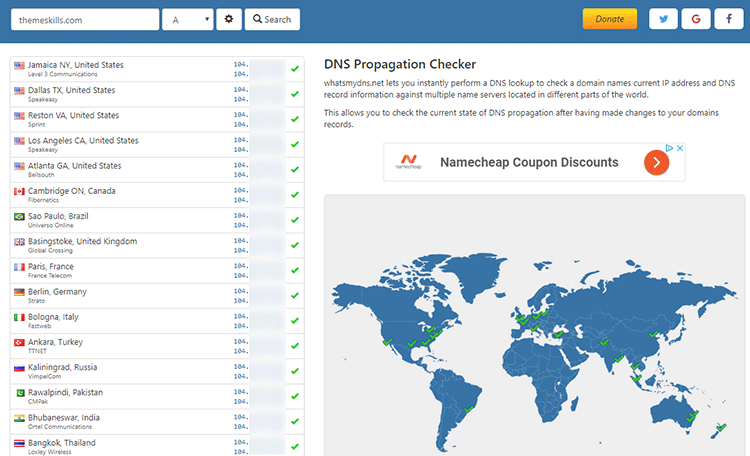
You can check the propagation status using this site.
Add your domain there, click Search, and the IP of your Cloudways server IP should appear with a green check mark.
Step 3 – If you are using Cloudflare
If you are using Cloudflare already, your domain’s DNS already point to Cloudflare, and it should remain that way.
So, all you have to do is to change the IP in Cloudflare.
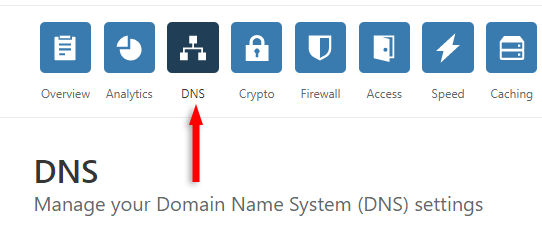
Log in and go to the DNS section.
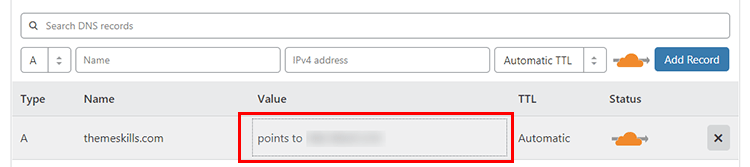
Now, click on the Value box of the A record and change the IP of your old host with the one from your Cloudways server.
That’s it.
In case your old host used cPanel, you might have some A records with cpanel, cpcontacts, webmail, and so on.
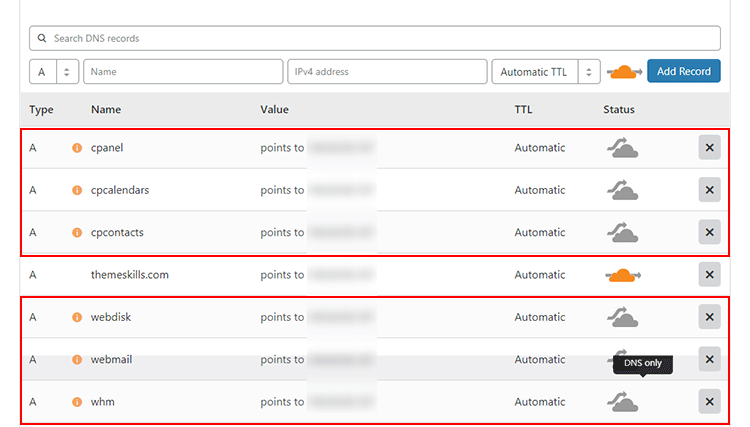
You can delete those since Cloudways doesn’t use that. If you’re not sure of something, contact them and ask.
Step 4 – If using Cloudflare
If you’re using Cloudflare, you’ll have to go to Servers > select your server > Server Management > Settings & Packages > Advanced and select Cloudflare from the WAF Module drop-down.
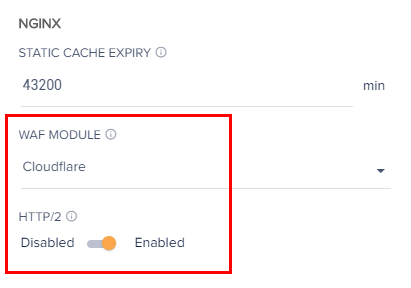
HTTP/2 should be enabled by default. If it isn’t, enable it.
Don’t forget to save!
IV. Enabling SSL (HTTPS) for Your Domain
Cloudways offers Let’s Encrypt SSL, which is free and awesome.
Before starting, remember when I mentioned above that the domain DNS might take a while to propagate, and you should check it with this tool?
Well, make sure that your DNS has propagated and you get green check marks, otherwise, the SSL certificate won’t install.
If it didn’t fully propagate, wait until it does, then proceed with the SSL installation.
Step 1
If you’re NOT using Cloudflare, go directly to Applications > select your application > Application Management > SSL certificate.
Add your email and domain and click on Install Certificate.
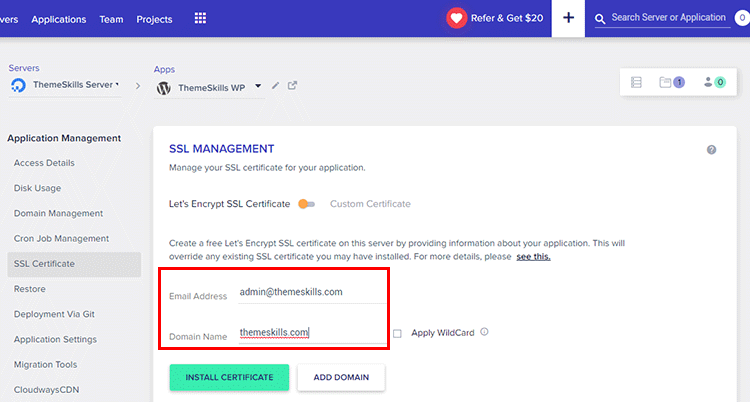
The domain needs to match the one added as primary in Domain Management (see above).
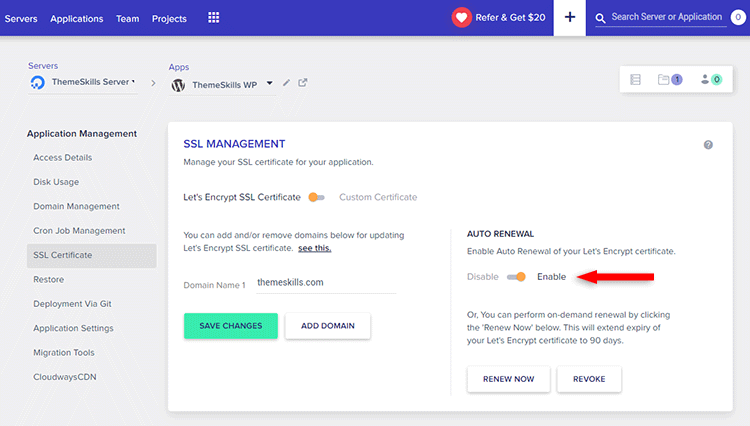
After it installs, make sure Auto Renewal is enabled.
If you’re using Cloudflare, first, you’ll have to disable it by going to its DNS section and clicking on the two orange clouds from the A record (the one with the IP) and CNAME (the one with www).
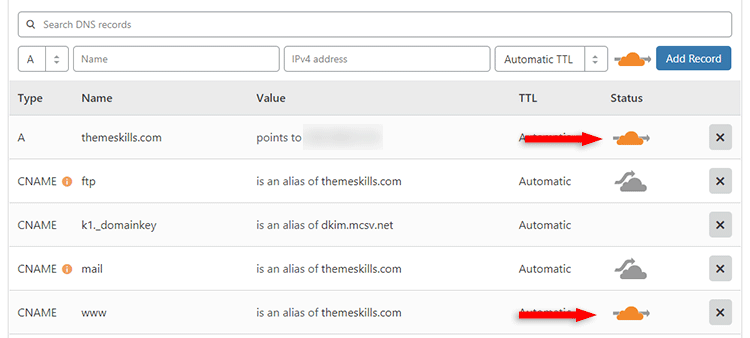
Click on them to make them gray like the other two.
Then, you can proceed with installing the SSL certificate as shown above.
After the Let’s Encrypt SSL certificate has installed, you can go back to Cloudflare and enable it by clicking on the two gray clouds to make them orange again.
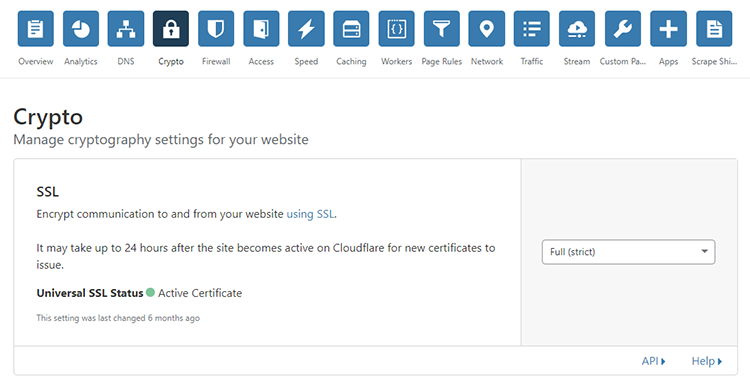
You should also set SSL to Full (Strict) on Cloudflare when using Let’s Encrypt. You can set that in the Crypto section.
You can check your SSL certificate with SSL Hopper.
If you’re using Cloudflare, you’ll see an SSL certificate from Cloudflare. If not, it means you don’t have SSL enabled on Cloudflare, and you should.
Let’s Encrypt still works, but between the server and Cloudflare.
If you’re not using Cloudflare, you should see a certificate directly from Let’s Encrypt.
Redirecting from HTTP to HTTPS
After installing the SSL certificate, your WordPress site will be served from both HTTP and HTTPS, which is not good because it creates duplicate content.
So, you’ll need to create a redirection from HTTP to HTTPS.
Step 1
Log in to your WordPress site, the one hosted on Cloudways.
The one on your old web host shouldn’t exist anymore because your WordPress site should be fully migrated to Cloudways by now.
Use your own username and password that you had, not the ones from the temporary WordPress installation.
Go to Settings > General and add s to the http:// links in WordPress Address (URL) and Site Address (URL).
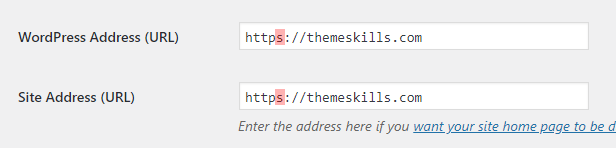
Click the Save Changes button.
Step 2
Since there’s no cPanel anymore, you’ll have to learn to use FileZilla to access your SFTP. Or you can use SSH if you’re more advanced.
I’m using FileZilla because it’s easier and I don’t have experience with SSH.
Here’s how to connect to your Cloudways SFTP using FileZilla.
Your SFTP username and password are in Servers > select your server > Master Credentials.
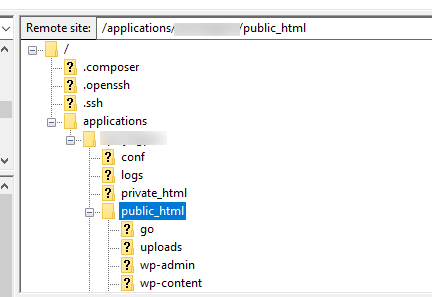
Once you’ve connected, in the Remote site window, click on the applications folder, then on your application's folder name, and then on public_html.
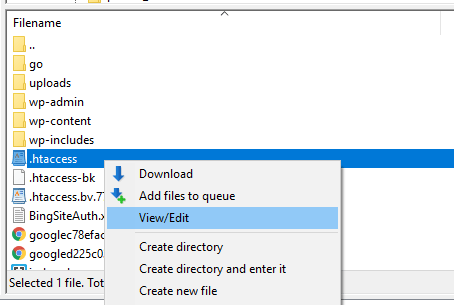
In the Filename window, right-click on the .htaccess file and select View/Edit.
A Notepad (in Windows; I think its equivalent in macOS is TextEdit) editor will open with the content.
At the top of the file, add this code:
RewriteEngine On
RewriteCond %{HTTP:X-Forwarded-Proto} !https
RewriteRule ^(.*)$ https://%{HTTP_HOST}/$1 [R=301,L]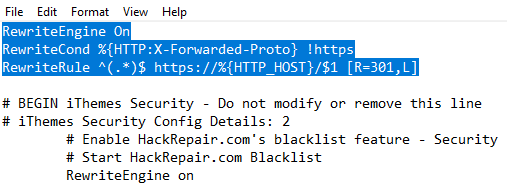
Save the file by going to File > Save.
Note
I don’t know if you noticed, but your old .htaccess file has been replaced with a new, default one after the WordPress site migration.
I’ll go into details about that below. For now, leave the redirection code in the new one.
Fix Mixed Content Warning
You’ll still have content served via HTTP in your source code, therefore, you’ll get a mixed content warning in your browser, telling you that the site is not secure.
The best way to fix that is by using the Better Search Replace plugin.
Install, activate it, and go to Tools > Better Search Replace.
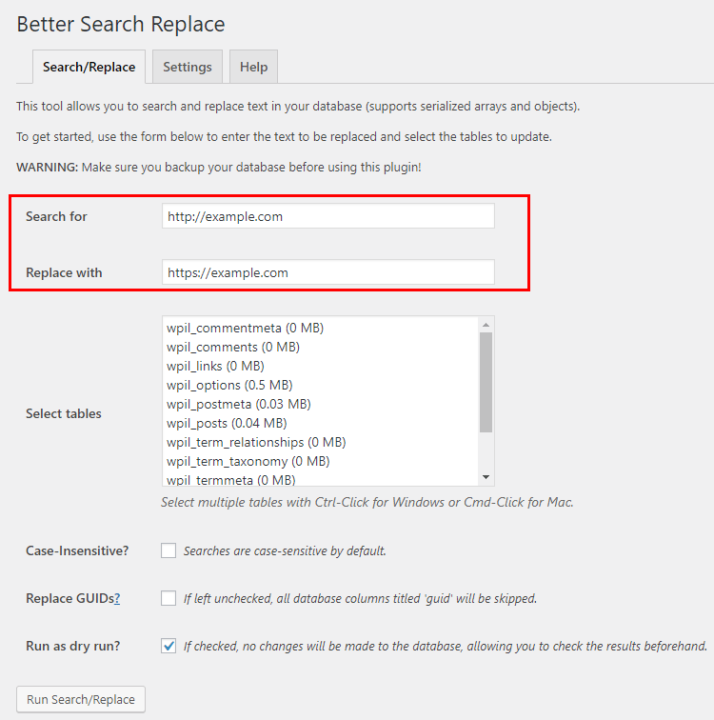
In the Search for field, add the http:// version of your domain.
In the Replace with field, add the https:// version.
Of course, change “example.com” with your own domain.
Run as dry run? will be enabled by default, meaning that it will search the database and show you the results without making modifications.
You have to disable that in order to make the changes.
It’s recommended to back up your database, but I assume you already did that before migrating your WordPress site to Cloudways, as I recommended above.
And since you haven’t modified content on the website yet, there’s no real need to back up the database again.
Click the Run Search/Replace button and wait.
This should solve the mixed content warning.
V. Other Important Things to Do
1. PHP and MYSQL versions
The newest versions won’t be installed by default, so you’ll have to install them by going to Servers > select your server > Server Management > Security & Packages > Packages.
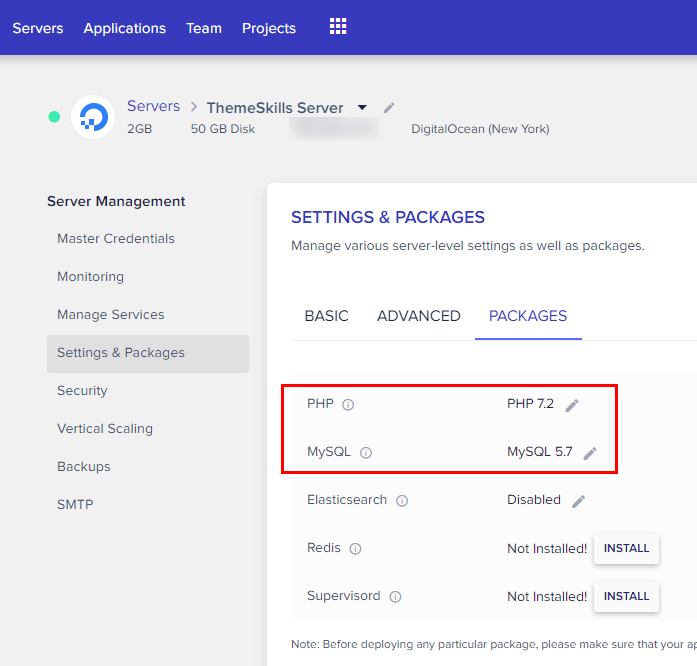
Install PHP 7.3 (don’t mind the 7.2 in the image) and MYSQL 5.7.
You’ll have to make sure that your theme and all your plugins support PHP 7.3, though. In most cases, they do.
2. Check your .htaccess and wp-config.php files
After the WordPress website migration, your .htaccess and wp-config.php files will be replaced.
This means that code that you or plugins added there is gone, so it needs to be added again.
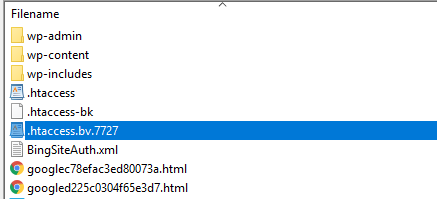
Your old .htaccess file hasn’t been deleted, though. It was renamed, therefore backed up.
You should find it renamed to something like this:
Now, you can either:
a) Open it with FileZilla (as you saw above), copy its content – except for any old HTTP > HTTPS redirection code and default #BEGIN WordPress code – and add it in the new .htaccess file.
b) Add the HTTP > HTTPS redirection code (mentioned in section 4) in your old, renamed/backed up .htaccess file. Then, edit the new one to disable it (e.g. .htaccessDISABLED), and rename your old, backed up one to .htaccess.
It sounds complicated, I know.
I think it’s best to go with option a).
Open your backed up .htaccess file (.htaccess.bv.7727 in my example) and copy whatever custom code you had there, if you had any. Then, paste it in the new one.
For plugins, such as caching or security plugins, just deactivate and reactivate them. They’ll re-add the code themselves in .htaccess if it’s missing.
For safety, back up your .htaccess file first by downloading it.
Right-click on it > Download.
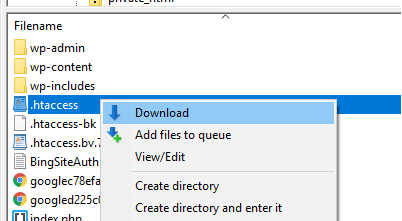
You can also contact Cloudways for support.
If you added custom code in your wp-config.php file as well (e.g. to disable revisions or disable WordPress auto-updates), then you have to add it again.
Also, if you have caching or security plugins, such as WP Rocket (review) or iThemes Security, deactivate and activate them.
Other plugins might need deactivation and reactivation, too.
3. Add custom folders back
If you had custom folders in public_html, they’ll be gone, so you have to add them again.
For example, I had to re-add my folder for cloaking affiliate links because it wasn’t migrated.
4. Varnish and WP Rocket
If you’re using WP Rocket, enable the Varnish add-on in Settings > WP Rocket > Add-ons.
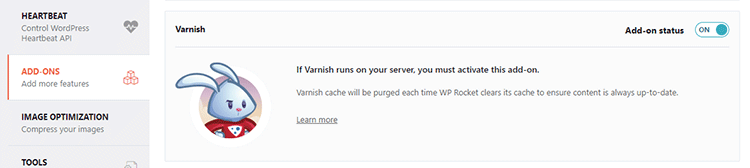
This way, the Varnish cache will be purged each time WP Rocket clears its cache.
If you’re using CSS/JS minification in WP Rocket, then go to Applications > select your application > Application Management > Application Settings > Varnish Settings and add add a new rule with the following code in the Value.
(.*)/?f=(.*)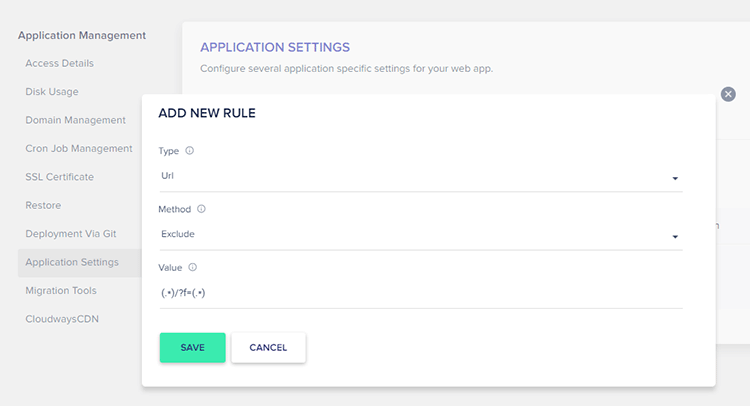
Url and Exclude are set by default, so leave them like that.
If you’re using Cloudflare, go to this WP Rocket guide and download the plugin mentioned there.
Unzip the plugin on your PC and edit the PHP file (there’s only one) with a text editor, such as Notepad or TextEdit.
Search for example.com and replace it with your own domain!
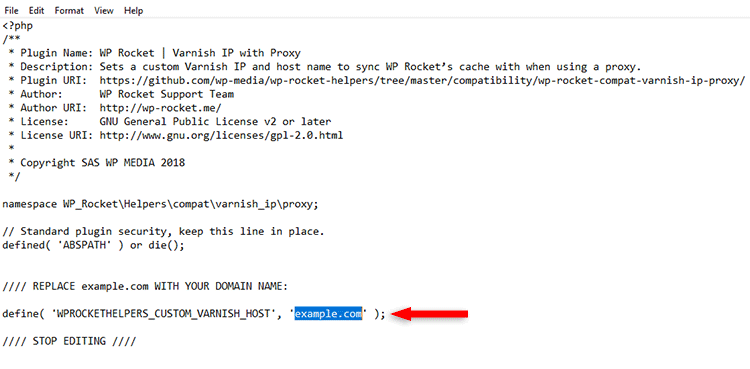
It’s just one. Ignore the one in the comment where the forward slashes are.
Now, zip the folder back. Zip only one folder, the second one. There are 2 identical folders when you unzip it, don’t know why. Only zip one, the one with the files.
Log in to WordPress and upload the zip file via Plugins > Add New > Upload Plugin.
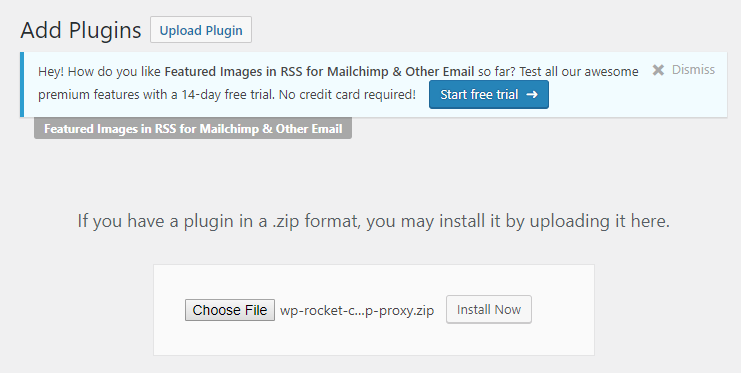
Click Install Now and activate it.
Now, go back to the WP Rocket guide and see how to check if the Varnish cache is cleared properly.
5. Add your server’s IP in Avada
If you’re using the Avada theme, Cloudflare, and Varnish cache (enabled by default in Cloudways), as I do, add your server IP in Avada > Theme Options > Performance > Cache Server IP.

If you don’t add the IP, you might end up with this error:
Failed to load resource: net::ERR_CERT_COMMON_NAME_INVALID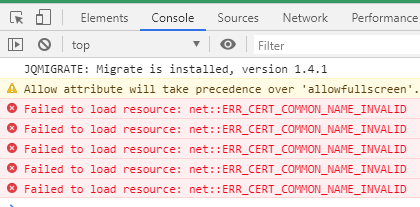
Adding the IP solved the issue for me.
You should purge the Varnish cache in Server Management > Manage Services after adding the IP.
I’ve written a separate guide on how to fix the ‘Failed to load resource’ error in Avada.
VI. Fixing Errors
You might end up with two more errors.
1. CORS error
Files are blocked from loading by Cross-Origin Resource Sharing policy.
This happens when a resource is loaded from another domain.
In my case, some font files were still loaded from the temporary WordPress URL.

This is actually a screenshot from the “ERR_CERT_COMMON_NAME_INVALID” error mentioned above, but the same path was causing trouble with CORS, too.
Those were not found in the database. At least I couldn’t find them with the Better Search Result plugin.
So, I contacted support and they changed the path via WP CLI.
You should contact them, too.
2. Seeing 127.0.0.1 instead of users’ real IP
If you’re using Cloudflare, this problem should be solved by selecting it in the WAF Module, as I pointed out in section 3, step 4.
If it’s not solved, then add the following code in your wp-config.php file, above the /* That's all, stop editing! Happy blogging. */ line.
if(isset($_SERVER['HTTP_X_FORWARDED_FOR'])) {
    $xffaddrs = explode(',',$_SERVER['HTTP_X_FORWARDED_FOR']);
    $_SERVER['REMOTE_ADDR'] = $xffaddrs[0];
}
I have a bunch of other stuff above that line.
If it doesn’t work, add the code at the top of the file, right after the PHP opening tag <?php.
I had this issue on NameCheap’s EasyWP hosting (review). It only worked if it was added at the top.
3. FileZilla errors
Sometimes, you might see an error like this one in FileZilla when working with your files:
/applications/your-app-folder-name/public_html/wp-config.php: open for write: permission denied)If it has the word “permission” in it, then it has to do with file permissions.
You can fix this by going to Applications > select your application > Application Management > Application Settings and clicking on Reset Permissions.

That’s a Wrap
I hope you found this tutorial useful and comprehensive, and it helped you to successfully migrate your WordPress website to Cloudways!
If you have any questions or thoughts, drop a comment or send a message via contact or Facebook page.
You can also hit the follow button on Twitter and subscribe to the YouTube channel.
Don’t forget to share the post to help out others!

Incredible tutorial. It helped me solving every single problem I was having!
Thank you very much!
That’s awesome! Thanks for dropping a comment and letting me know.
Thanks for such in-depth tutorial.
I am planning to migrate from Siteground GrowBig to Cloudways, I have a question where I can’t find answer yet:
How to renew my domain address after I migrate to Cloudways? Since my domain address comes with Siteground bundle.
Thanks!
Thank you so much! You solved my issues for migrating from SiteGround to Cloudways while using Cloudflare (by adding the step to disable the proxy while setting up the certificate), which even the Cloudways chat didn’t suggest could be my issue.