
The HTTPS frenzy started when Google announced that using a secure connection through an SSL certificate will be a ranking signal.
Since then and until today, more and more webmasters are moving their websites to HTTPS, especially when you can get it for free through a certificate authority like Let’s Encrypt.
Moving your WordPress site from HTTP to HTTPS is a hassle for many webmasters, especially for beginners, but in this article, I’ll walk you step by step, and in the end, it won’t seem so hard.
Purchase an SSL certificate or get it for free with Let’s Encrypt
Like I mentioned above, there is a free way to get a certificate through Let’s Encrypt, but not every hosting company has it implemented in order to simply activate it.
You can still use it even if they don’t have it implemented, but you’ll have to go through a more lengthy procedure.
You’ll also need your hosting company’s help and acceptance. Some will not allow it because they want you to buy a certificate, so they can make some extra bucks, I assume.
Here’s a list of web hosting companies that support Let’s Encrypt. The web host we use and recommend, SiteGround (this is an affiliate link), is listed there.
In case you are unable to install Let’s Encrypt, or you shouldn’t use it anyway, then you’ll have to purchase an SSL certificate, which is usually done through your hosting company.
The reason I said that perhaps you shouldn’t use Let’s Encrypt anyway is that it doesn’t cover all type of websites/domains. You can read more about that here.
Purchasing / installing SSL certificates differs from host to host, so I can’t go into details. Therefore, either check their documentation on how to install Let’s Encrypt or purchase a certificate, or contact them to do it for you.
The installation could be instant, could take 10 minutes or even 24h – especially with the purchased ones. They usually let you know when the certificate was installed, or you could check the status in your control panel (usually cPanel), or your account; depends from host to host.
But the simplest way to verify if your certificate was installed properly, try and load your site through HTTPS to see if it’s working and if it’s displaying just like on HTTP.
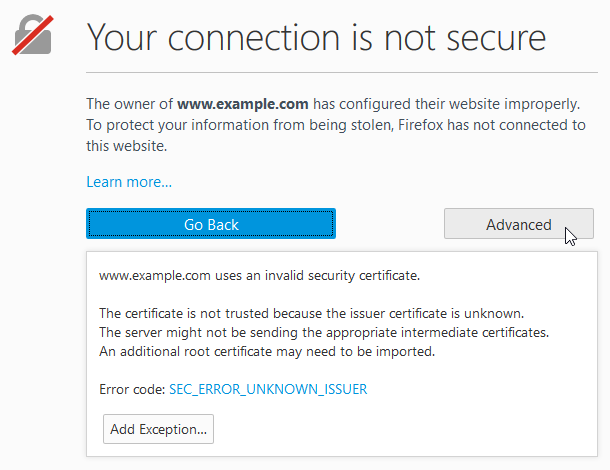
If you get a browser error like the one below, then your certificate is not ready yet. The error differs from browser to browser.
Moving your WordPress site to HTTPS
After your SSL certificate is installed properly and everything’s fine, you can start the moving process.
Phase 1
- Log into WordPress and go to Settings -> General;
- Most likely, the WordPress Address (URL) and Site Address (URL) will have the HTTP version. Change both of them by just adding an extra “s” to “http” in order to make it “https” (e. g. https://yourdomain.com);

Here’s what to do in case your WordPress Address (URL) and Site Address (URL) are greyed out and you can’t edit them.
Phase 1 done!
Phase 2
I’m going to instruct you based on cPanel. Some things might differ if you’re using other types of control panels or 3rd party software, but the things that you have to do remain the same.
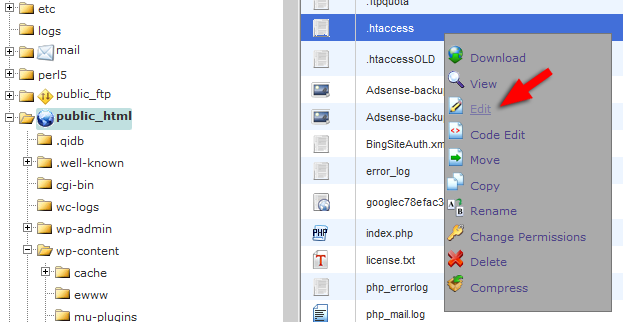
- Access your .htaccess file through your control panel or through a 3rd party software. Find out here how to access your WordPress files (point 1 doesn’t work for the .htaccess file);
- Search for your .htaccess file in the
/public_html/folder, where it’s usually found; - Backup your file by downloading it to your computer. Usually, it’s right-click and select Download;
- After you backed it up, right-click on it and select Edit;
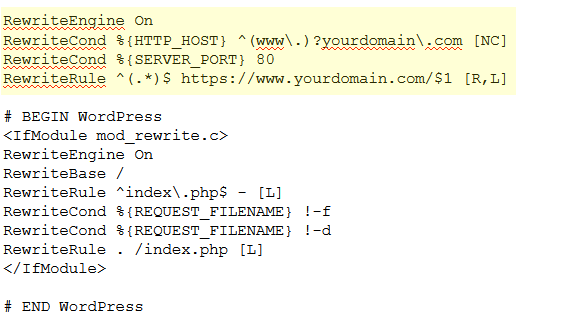
- Then, before the
# BEGIN WordPressrow, add one of the two codes and save the file;
If you’re using WWW for your website (e.g. https://www.yourdomain.com)
RewriteEngine On

RewriteCond %{HTTP_HOST} ^(www\.)?yourdomain\.com [NC]

RewriteCond %{SERVER_PORT} 80

RewriteRule ^(.*)$ https://www.yourdomain.com/$1 [R=301,L]
or
RewriteEngine On

RewriteCond %{SERVER_PORT} 80

RewriteRule ^(.*)$ https://www.yourdomain.com/$1 [R=301,L]
If you’re not using WWW for your website (e.g. https://yourdomain.com)
RewriteEngine On

RewriteCond %{HTTP_HOST} ^yourdomain\.com [NC]

RewriteCond %{SERVER_PORT} 80

RewriteRule ^(.*)$ https://yourdomain.com/$1 [R=301,L]
or
RewriteEngine On

RewriteCond %{SERVER_PORT} 80

RewriteRule ^(.*)$ https://yourdomain.com/$1 [R=301,L]
Some web hosts, especially big ones, are well-documented and you can find in their knowledge base the proper redirection code that works best on their servers. Try and search for that first. The above codes are somewhat standard/general but work well on most web hosts.
Now open a new browser or an incognito window, just to make sure the browsing cache doesn’t intervene in some way, and type in your site’s URL using the HTTP version (e.g. http://yourdomain.com).
If it redirects to the HTTPS version (e.g. https://yourdomain.com), then the job was done successfully. If it doesn’t redirect, then something didn’t go well and you’ll have to check things out.
If something goes bad, like an error occurring, don’t panic! Either remove the code from .htaccess, or upload the backup file that you downloaded on your computer in order to replace the other one, and everything will be back to normal. Then try the second redirection code.
Fix mixed or insecure content warnings
If you built your site and created content under the HTTP version, and then switched to HTTPS, you’ll most likely not see the perfect green padlock next to your domain.
If you click on the padlock area to find out more information, it will say something like this (depending on the browser; I’m showing for Firefox): “Some parts of this page are not secure, such as images.”.

This happens because, even if you switched your domain to HTTPS, your links from your web pages are still served the old way, via HTTP. This basically includes internal links and images.
External links, the links pointed to other websites, don’t count and won’t trigger a warning, since it’s not your fault if someone else doesn’t have their site on HTTPS.
Fortunately, there are plugins for this, unless you want to manually change the URLs in your database :). I’ll recommend one: SSL Insecure Content Fixer. It also supports MultiSite.
This plugin should solve all issues from the start. However, if something slips and you still get the mixed/insecure content warning, you have to check your source manually and see what’s still left as HTTP. You can do this by:
- Right-clicking anywhere on your page and selecting Inspect Element or Inspect (depends on the browser) and then clicking on the Console tab;
- Right-clicking anywhere on your page and selecting View Source or Source (depends on the browser), then pressing CTRL-F or CMD-F (for Mac), and then inserting
http://in the search box, and then spotting what internal links you might have left that point to HTTP; - Using https://www.whynopadlock.com/, which is the easiest way.
After you spotted the “leftovers”, download Better Search Replace and replace the HTTP URLs with HTTPS.
Now you should be good to go, with a proper redirection and without any warnings.
That’s a wrap
Hope you found the post useful and comprehensive!
Don’t forget to share it with your friends!
If you have anything to add or ask, drop a comment, contact us, or send us a message on Facebook.

Hello, I went into settings and changes http to https and now I am locked out of wordpress completely. Do you have a solution to this as it is a clients website and I am concerned I have lost everything completely. Nick