
In my opinion, WP Rocket (affiliate link) is currently the best caching plugin for WordPress.
It works very well, it offers a lot of useful and important features, and it allows you to get rid of a lot of other plugins.
I’ve been using it for 3 years and I’m more than happy with it!
If you want more details, then here’s my WP Rocket review.
SiteGround’s (affiliate link) built-in caching system, SuperCacher, which works only for SiteGround customers and through the SG Optimizer plugin, is also good to have.
You could even use it on its own if you can’t afford WP Rocket, especially now when they completely refactored it, added numerous new features, and it’s not missing crucial things anymore, such as GZIP compression and browser caching.
While it has become a good caching plugin, it still can’t really beat WP Rocket.
But it does have an important feature that WP Rocket doesn’t, which I’ll talk about below.
So, if you are a SiteGround user, it will be worthwhile to use SG Optimizer in combination with WP Rocket.
And yes, they are compatible.
Using WP Rocket with SG Optimizer
Even if they are compatible, I don’t recommend using the same set of features on both plugins.
And this should be a general rule. Don’t use two or more plugins that do the same thing.
So, basically, all you’ll have to do is to simply enable a caching feature that’s important but missing from WP Rocket.
That feature is called Memcached, which is a memory caching system that speeds up the database queries.
You don’t have to do anything in WP Rocket besides setting it up according to your WordPress website’s needs.
If you don’t have the SG Optimizer plugin installed, do it before proceeding with the below steps.
Step 1
Go into SiteGround’s cPanel and access the SuperCacher tool.
Step 2
Disable the Static Cache and Dynamic Cache.
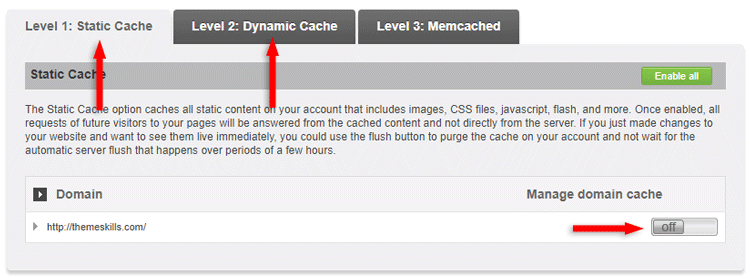
Go to the Memcached tab and turn it on.

Step 3
Log in to WordPress and go to SG Optimizer > SuperCacher Settings.
Make sure the Dynamic caching is disabled – even if it shouldn’t work if it’s disabled from within the SuperCacher tool – and enable the Memcached setting.
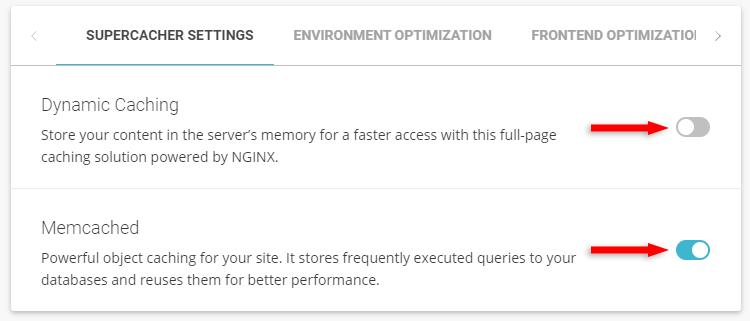
You let SG Optimizer handle the Memcached process while WP Rocket handles everything else.
This should improve your WordPress website’s speed.
If it makes things worse, then you might want to consider disabling SG Optimizer entirely and only use WP Rocket.
As with any caching plugin, a bit of before and after testing is required.
Step 4 – Important!
Except for the Enable HTTPS option (in case it was already enabled and used), everything from Environment Optimization, Frontend Optimization, and Image Optimization should be disabled!
Those settings are normally automatically disabled by WP Rocket, but, to be sure, check them anyway.
Everything there (except for image compression) is offered by WP Rocket, so if you want one of those features enabled, enable it in WP Rocket.
You could enable the New Images Optimization and Existing Images Optimization options if you are not already using another plugin for that (WP Rocket doesn’t offer that), but don’t enable Lazy Load Images since that’s offered by WP Rocket.
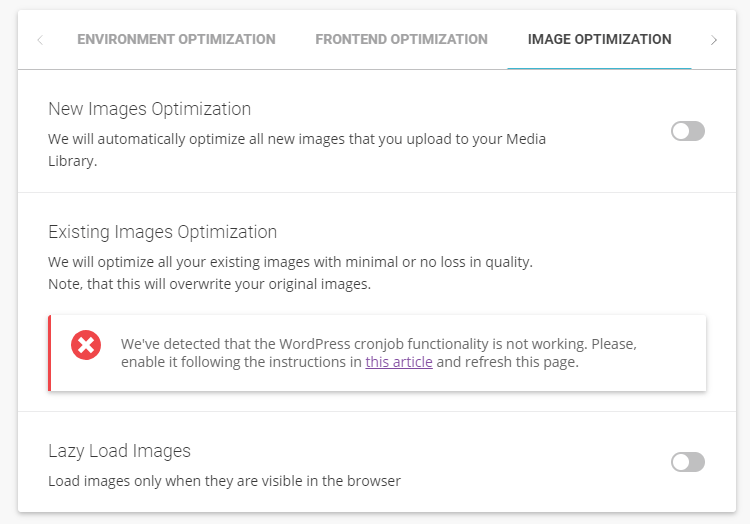
In case you’re wondering: That “WordPress cron job functionality” error shows because I’ve replaced the default WordPress cron with a real cron job in cPanel.
That’s a wrap
Hope you found the guide useful and WP Rocket works great with SG Optimizer on your WordPress website!
Don’t forget to share the post to help out others!
You can quickly subscribe to my newsletter by using this link.
If you have any questions or thoughts, drop a comment or send a message via contact or Facebook page.
You can also hit the follow button on Twitter and subscribe to the YouTube channel.
My WordPress website services are at your disposal!

Which one should I use I don’t want to use both. In your opinion which one is the best plugin? Right now we are using Wp Rocket alone.
Well, you’re not quite using both since you’ll only be using the Memcached function from SG Optimizer, which WP Rocket doesn’t have. But sites that don’t have a lot of traffic and activity going on can go on without Memcached.
Anyway, if you want to only use one, definitely go for WP Rocket.
Thanks. This was helpful.
I’m glad it helped you out!
I read this post while searching for a best setting to use both and what to be activated and what to be disabled.
https://wordpress.org/support/topic/sg-optimizer-wp-rocket-not-compatible/
Can you explain which one should be best used.
I haven’t read anything official. As far as I know, there’s no problem if they are set up properly, as it’s mentioned in my post. Basically, use SG Optimizer only for the Memcached feature that WP Rocket doesn’t provide. Let WP Rocket take care of the rest.
I’ve used the SG Optimizer + WP Rocket + Cloudflare combo without any issue until I moved to Cloudways.
If you still want to choose only one, then I recommend going for WP Rocket.