You’ve probably seen the “Leverage Browser Caching” warning in the speed test tools that you use for your WordPress website, such as WebPageTest or Pingdom.
This can be fixed by using a good caching plugin, such as (affiliate link) WP Rocket (review).
But if – for whatever reason – you’re not using one or it doesn’t work properly, then you can manually add the browser caching code on your server.
So, in this tutorial, I’ll show you how to fix leverage browser caching in WordPress via .htaccess.
But, first, let me briefly tell you what’s that warning about.
What does Leverage Browser Caching mean?
For a browser to display your WordPress website, it needs to download all the necessary files from the server.
Some pages might consist of large files, and the larger the files, the longer it takes to download them and load your website.
This is where browser caching comes in handy because it stores some of these files locally, in the user’s browser, when they first visit your site.
So, the next time the user visits your website, the browser already has some files downloaded, and it can use them immediately, without having to download them again.
Thus, improving the loading time!
Fix leverage browser caching in WordPress using .htaccess
mod_expires enabled on your server! If you don’t have it, then talk to your web host.Step 1 – Access your website’s files
First, you need to access your WordPress website’s files.
Then, you’ll need to find your .htaccess file, which is normally in the root folder – /public_html/.htaccess.
If you’re using an add-on domain, not your main one, then you should usually look in YourDomain/public_html/.htaccess.
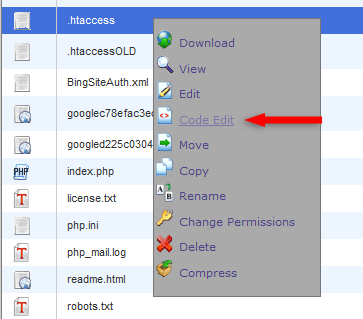
Editing .htaccess in cPanel
Step 2 – Add the browser caching code in .htaccess
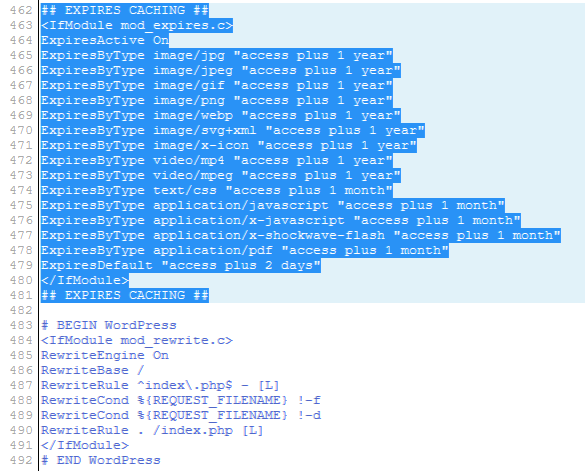
Open the .htaccess file for editing and add the below code to enable browser caching for your WordPress website. Add it right before the #BEGIN WordPress line.
Don’t forget to save the file!
Here’s how it should look like:
And since you’re already editing your .htaccess file, you should also enable GZIP compression if you don’t have it already.
Things to consider when enabling browser caching
1. Browser caching doesn’t apply to external files as well (Facebook, Google, etc.). It only works for your own WordPress website’s files that are on your server.
2. The expiry times from the above browsing cache code are standard and work fine in the vast majority of cases.
But, depending on your website, you might need to set different ones if you update certain files more frequently. Otherwise, your returning visitors might not see the new changes.
That’s why, when you make some changes to your WordPress website and they don’t appear, the first thing everyone will tell you is to clear your website and browser cache.
That’s a wrap
I hope you found the tutorial comprehensive and you understood how to fix leverage browser caching in WordPress via .htaccess!
Don’t forget to share the post to help out others!
You can quickly subscribe to my newsletter by using this link.
If you have any questions or thoughts, drop a comment or send a message via contact or Facebook page.
You can also hit the follow button on Twitter and subscribe to the YouTube channel.
My WordPress installation service is at your disposal!
On-going WordPress support and maintenance services are on the menu as well!

Leave A Comment