
Cron (wp-cron.php) is a built-in WordPress feature which handles your website’s scheduled events.
If you schedule a post or a backup, for example, WordPress cron will check for them, and then launch them.
The thing is that WordPress cron is executed when someone visits your website – every single time someone visits your website, that is.
So, if you have a lot of traffic, then having WordPress cron triggering every time someone visits your website will create a lot of calls to the wp-cron.php file, which can impact your server’s resources like the WordPress Heartbeat API does, which I discussed in our previous post.
Therefore, it’s strongly recommended that you disable the built-in WordPress cron and create a cron job on your server, which will execute at specific intervals of time.
How to disable WordPress cron
For this, you’ll need to be able to access your WordPress files.
1. Find the wp-config.php file, which should usually be in the /public_html/ folder.
Or, if you have more than one WordPress website on your account, and you need to access one of your add-on domains’ files, then you need to look in its own folder: /public_html/yourdomain.com/.
2. Once you found the wp-config.php file, edit it and add the below code, right above the /* That’s all, stop editing! Happy blogging. */ line.
define('DISABLE_WP_CRON', true);
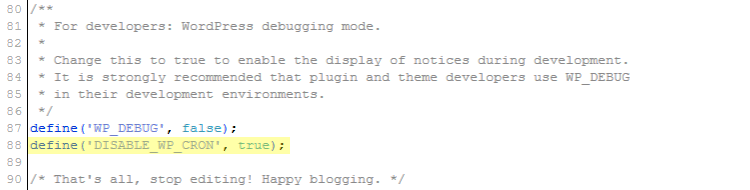
3. Save the file.
How to add a Cron Job in cPanel
1. Log in to your web host’s cPanel.
2. Find the Cron Jobs tool and click on it – its location depends from web host to web host.
3. Under Add a New Cron Job, at Common Settings, choose Twice Per Hour (0,30 * * * *).
This means that the cron job will execute every 30 minutes, instead of executing every time a user visits your website.
It’s not optimal to add a cron job to run in less than 30 minutes! You can choose to run it once per hour if you wish, but not in less than 30 minutes!
4. In the Command field, add this line:
wget -q -O - https://yourdomain.com/wp-cron.php?doing_wp_cron >/dev/null 2>&1
Don’t forget to replace yourdomain.com with your actual domain name!
Now, this should work fine in the vast majority of cases. But, there’s a chance that it won’t work on some systems, so you’ll have to add the path to wget, which normally is /usr/bin/.
Then, the command will be:
/usr/bin/wget -q -O - https://yourdomain.com/wp-cron.php?doing_wp_cron >/dev/null 2>&1
I recommend using the first command, and if it doesn’t work, add the second command.
5. Click the Add New Cron Job button.

Now your WordPress website will run scheduled tasks in an optimal way, without creating excessive calls that will burden your server’s resources!
cPanel Cron Job Alternative
Since some web hosts might not have this feature, or it won’t work properly, you could try an external tool, such as EasyCron, which offers different solutions for different needs, including a free package!
That’s a wrap
Hope you liked the tutorial and found it comprehensive.
Don’t forget to share it in order to help out others!
You can also follow us on Twitter and subscribe to our YouTube channel.
If you want to start your own WordPress blog, or need a website for your business, our WordPress services are at your disposal!

Why shouldn’t we add a cron job to run in less than 30 minutes? I think the scheduled times should be considered by individual instance and judged on the traffic.
So you can have less executions and don’t overuse the server resources. This is considered the optimal setting, especially on shared environments, which most webmasters have.
Whats the difference between the 2 commands? Which one is the best way nowadays? Thanks
And doe the cd command require this at the end: >/dev/null 2>&1
There are even more commands out there, and different people have different opinions on which is better.
I chose the most common one (the first one) and added the extra
/usr/bin/path to it because I did some research and found out that, on some systems, it won’t work without specifying the path towget.Use the first command. I’ll actually update the post and delete the second one to avoid confusion.