
The Heartbeat API was introduced in WordPress 3.6, and its purpose is to allow WordPress to communicate between the browser and the server.
The WordPress Heartbeat API is used for auto-saving, revisions, showing an author that a post is being edited by another user, and several other things.
While it’s a useful feature, it can cause trouble sometimes, like slowing down your WordPress website or increasing your server’s CPU usage due to excessive requests, especially when it’s being triggered once every 15 seconds in some cases, like when editing a post.
Some plugins might use it as well, mainly to provide notifications in real-time.
When performing a speed test for your WordPress website, you might notice this AJAX call: /wp-admin/admin-ajax.php, which might be performing poorly. Well, that’s the WordPress Heartbeat API at work.
In order to prevent or fix issues, I’ll show you how to disable the WordPress Heartbeat API or limit its execution frequency.
How to disable the WordPress Heartbeat API
I’ll show you how to disable it by using a simple code or a plugin, called Heartbeat Control.
Method 1 – Disable Heartbeat API using code
First, you’ll need to be able to access your WordPress files.
Then, edit your child theme’s function.php file, which should usually be found in /public_html/wp-content/themes/YOURTHEMENAME-child/functions.php.
I strongly recommend using a child theme, otherwise the changes will be lost with the next theme update! Also, back up the functions.php file or the whole website, just to be extra safe.
Once you’ve found the function.php file, edit it and add this code at the very bottom:
add_action( 'init', 'stop_heartbeat', 1 );

function stop_heartbeat() {

wp_deregister_script('heartbeat');

}
Save the file, and the WordPress Heartbeat API should be successfully disabled!
Method 2 – Disable WordPress Heartbeat API using a plugin
The Heartbeat Control plugin has very few and simple settings.
After you install the plugin, you can access its settings by logging in to your Dashboard and going to Settings -> Heartbeat Control Settings.
There, you can partially or completely disable the Heartbeat API.
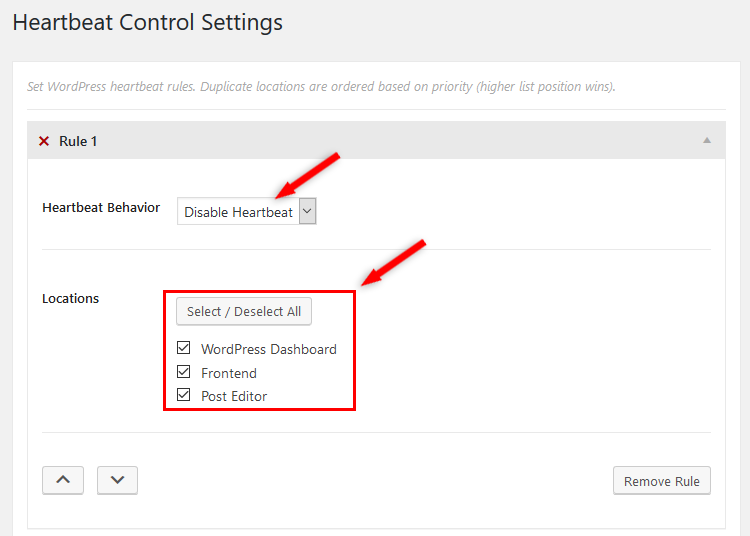
If you want to completely disable it, select Disable Heartbeat from the Heartbeat Behavior drop-down menu, and then select all the Locations. Don’t forget to press the Save Changes button.
How to Limit WordPress Heartbeat API
For this, we’ll use the “Heartbeat Control” plugin as well.
If you just want to limit its execution frequency, then it shouldn’t be completely disabled, right?
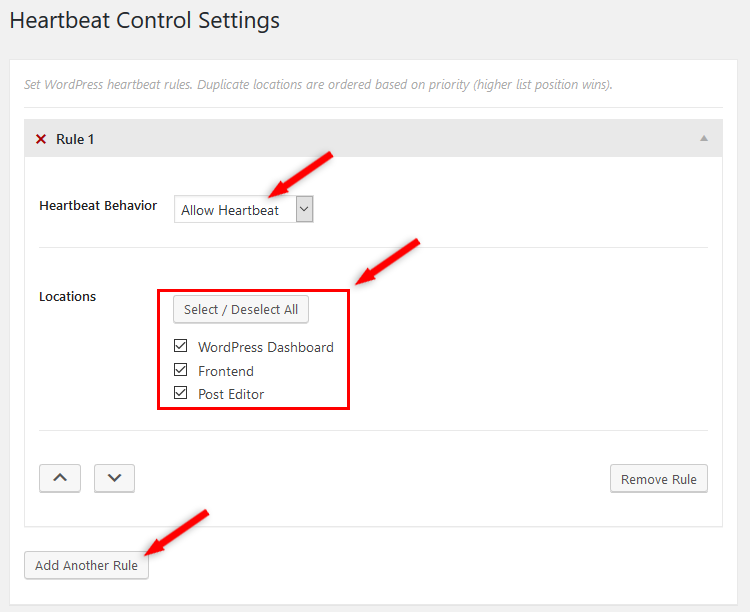
Therefore, in the Rule 1 box, select Allow Heartbeat from the Heartbeat Behavior drop-down menu, and then select the Locations where you want it to be allowed.
Then, press the Add Another Rule button.
Now, in the Rule 2 box that appeared, select Modify Heartbeat from the Heartbeat Behavior drop-down menu, and then select the Locations where you want its frequency changed.
Then, select the frequency that you want by using the Frequency bar.
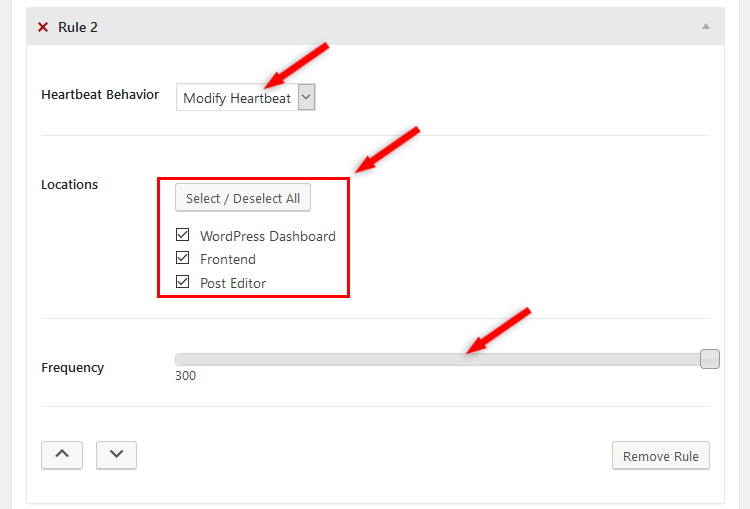
It’s set to 15 seconds by default, but I’ve set it to 300 seconds (5 minutes).
Or, if you want to allow it everywhere, and just limit its frequency, you can also directly select Modify Heartbeat in the Rule 1 box, without adding a second rule.
Press the Save Changes button now, and the WordPress Heartbeat API should be successfully limited.
That’s a wrap
Hope you liked the post and found it comprehensive!
Don’t forget to share it to help out others!
You can also follow us on Twitter and subscribe to our YouTube channel.
If you want to start your own WordPress blog, or need a website for your business, our WordPress installation service is at your disposal!

Leave A Comment