Images are a vital part of any website/blog, but they can also cause trouble if they aren’t properly optimized: they increase the size of your page, therefore its speed, which is an important factor for both SEO and User Experience; they increase your bandwidth; they reduce storage on your server.
So, if you want to avoid such problems, and I assume you do, keep reading this comprehensive guide on how to optimize images for WordPress!
The importance of images
There are a lot of reasons why you should always use images on your website and blog posts. I’ll try to pin them down; if I miss any of them, please feel free to leave a comment and let me know!
- Images make the content look a lot more appealing;
- Images enhance User Experience;
- Images make your content richer, a thing which search engines love, resulting in better rankings;
- Images divide the content, making it easier for users to read. Users don’t like reading big blocks of content, so they’ll probably leave (like I do) without interacting with the page or other pages, negatively impacting your bounce rate;
- If your content is rich, by using images or videos, especially when writing tutorials, then your articles’ chances to get shared on social media are increased;
- Images can get you referral traffic from image search results (if you use proper alt texts);
- Images improve your CTA (call-to-action) by visually stimulating the users.
Now, don’t use images just for the sake of using them. Use images when and where it’s relevant. Maybe some articles don’t need images inside the content, especially thin ones.
What file format should you use
The most common formats are JPEG and PNG.
- JPEG (Joint Photographic Experts Group) is better when it comes to photographs or images that contain a large variety of colors. The format uses lossy compression, meaning that the image quality is somewhat reduced so it can produce a smaller file size;
- PNG (Portable Network Graphics) is better for simpler images, like screenshots or images containing text, line art, etc. The format uses lossless compression, meaning that the quality won’t have to suffer, but the file size will be larger.
Here’s a JPEG vs PNG example. The JPEG compression has been exaggerated so you can clearly observe the loss of quality that takes place.

How to optimize images for WordPress before you upload them
1. Adjust the images to fit your content area
For example, if your post’s content area is 700px in width, don’t upload an image that’s 2000px in width. Upload an image that fits your layout (700px or smaller).
There could be exceptions, though. For example, you made a screenshot for a tutorial, but if you scale it to 700px, the writing might be too small and hard to read, so you need to upload a bigger image on which the users can click to enlarge.
Some images need to be extra big for responsive design purposes, but this applies for your site’s pages (e.g. Homepage), where you might use parallax and stuff like that.
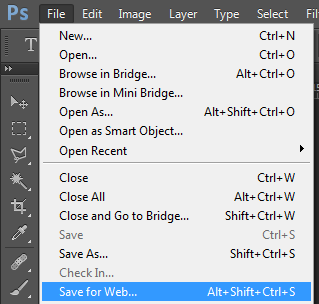
2. Use a graphics editor software
I use Photoshop. This is also useful for adjusting the size of your images, as I mentioned above.
In Photoshop, you have an option called “Save for Web”, or something like that (depends on your Photoshop version), which lets you optimize your images before saving them.
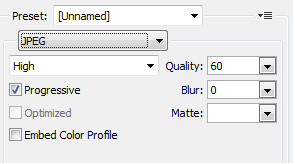
There you have several options that you can choose from, like file format, image quality, etc. I usually choose “Progressive” and “High Quality: 60” for .JPEGs, and PNG-8 (256 colors) for .PNGs.
You can use GIMP as a free alternative. Here’s a detailed tutorial on how to use it.
How to optimize images for WordPress after you upload them
This is where the WordPress plugins take over. No more manual work!
1. Using image optimization plugins to further reduce the size of your images
The below plugins reduce the file size without affecting the quality.
I believe that the most common plugin for image optimization is WP Smush. The downside of this plugin is that it won’t work on HTTPS websites (it does now) and images larger than 1MB. If you want these features, you need to go pro.
A good and free alternative to WP Smush is EWWW Image Optimizer, which we currently use. It’s a very good plugin, with lots of features!
Its options might seem a little bit overwhelming, but usually, there’s no need for extra configuration after you install it, except if you need it to perform other things besides reducing your images’ size.
Update (10/18/2017): The EWWW Optimizer plugin can sometimes stress the server too much. I recommend using WP Smush or a free online tool, like Optimizilla.
2. Using Lazy loading
Lazy loading means that the image loads only when the users scroll down to its view frame. This feature saves a lot of resources, making your page to load a lot faster.
Here’s an example of lazy loading with fade-in effect. When I first accessed this page, only the first 3 images (the number of images depends on your screen’s size) were instantly loaded. As I began to scroll down, I noticed how the rest of the images started to appear, one by one.

A good WordPress plugin for lazy loading is BJ Lazy Load. It’s easy to configure and does a great job. Unfortunately, this kind of plugins might not work well with every theme or gallery plugin.
We tried to use BJ Lazy Load on this site, but some theme features stopped working properly and some images from certain blog posts weren’t loading. We didn’t find out what caused the issue, but, to be honest, we didn’t really try that hard. We just stopped using it in the end, and we didn’t try to install other plugins, because, like I said, the problems may appear only in certain places, making them difficult to spot, and we don’t want more unpleasant surprises.
This doesn’t mean you shouldn’t use it! Most of the times it works without problems. Just make sure you check things out after you install it.
Here are two alternatives to BJ Lazy Load:
Or, if you’re using the WP Rocket caching plugin, you’ll be happy to know that it has a lazy load feature built-in, so you won’t have to install another plugin!
Conclusion
Optimizing images for your WordPress website/blog is vital. You should never skip this step! Optimizing your images will improve your page speed, therefore your User Experience and SEO, and it will also reduce bandwidth and storage on your server.
Make sure that, in the optimization process, you won’t badly affect the quality of your images.
Hope you enjoyed our guide on how to optimize images for WordPress! If you have questions or just want to share your thoughts with us, please leave a comment!

Leave A Comment