There are several ways to add custom CSS to your WordPress theme and front-end, but those methods won’t work for your back-end as well.
So, if you want to add custom CSS to your WordPress admin area, you’ll need to use another method.
This method consists of installing a simple plugin called Add Admin CSS, which is created by Scott Reilly!
He also created the Admin Trim Interface plugin that I mentioned in this post about how to remove elements from your WordPress admin interface.
Now, let’s get to it!
How to use the Add Admin CSS WordPress plugin
Step 1 – Install the plugin
Install Add Admin CSS.
Here are different ways to install a WordPress plugin.
Step 2 – Check the settings
Go to Appearance > Admin CSS to access the plugin’s settings.
Step 3 – Add your custom CSS code
Add you custom CSS code in the Admin CSS box, then click the Save Changes button.
Here’s how to find out a CSS class or id in WordPress.
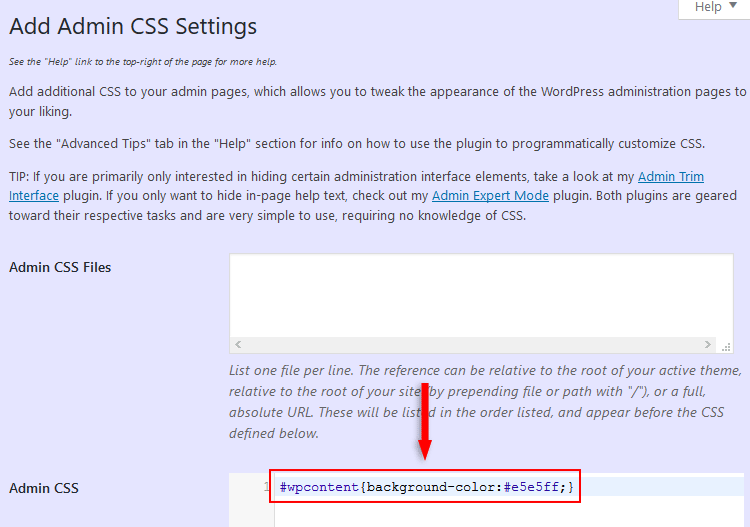
As you can see, I added a custom CSS code to change the background color of the WordPress admin content area – the area that’s on the right side of the Dashboard sidebar.
I changed it from the default light gray to a purple-ish one.
If you use and like the Add Admin CSS plugin, consider donating by clicking on the Donate to this plugin button found at the bottom of the sidebar on the plugin’s page.
That’s a wrap
I hope you found the post useful and managed to add custom CSS to your WordPress admin area!
Don’t forget to share the post to help out others!
You can quickly subscribe to my newsletter by using this link.
If you have any questions or thoughts, drop a comment or send a message via contact or Facebook page.
You can also hit the follow button on Twitter and subscribe to the YouTube channel.
My WordPress installation service is at your disposal!
On-going WordPress support and maintenance services are on the menu as well!

Leave A Comment