This post was last updated on 5/13/2018.
Update 2: You can now add a link to the WordPress image widget.
Update: Since the release of version 4.8, WordPress now includes an Image widget, but you can’t add a link to your image, so you’ll still have to use the Text widget or a plugin for that.
Adding an image in a WordPress post or page is easy because all you have to do is to press the “Add Media” button, choose your image, add some additional information (e. g. alt text and title), and then insert it somewhere in your content.
But adding an image in a WordPress widget is not so simple, especially for beginners, because you have to add some HTML code since WordPress doesn’t come with an image widget by default.
In this article, I’ll show you how to add images in your widget by using some HTML code in a text widget, and I’ll also recommend two simple plugins.
- Related post: How to disable the media attachment pages
Click here if you want to jump straight to the video tutorial.
Adding an image using the text widget
The simplest and fastest way to do this is to:
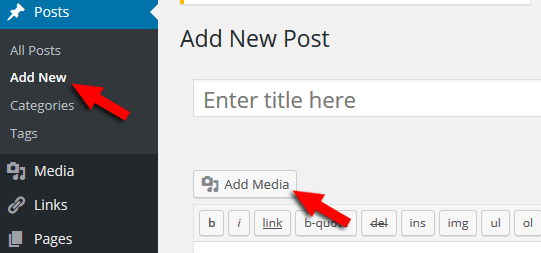
1. Start a new page or post, then press the “Add Media” button in order to choose the image you’d want to add in your widget.
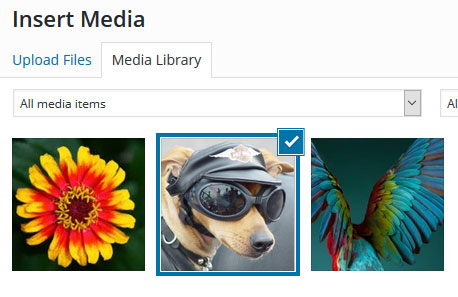
2. Select your desired image from the Media Library.
3. After you’ve selected it, check the “Attachment Details” and “Attachment Display Settings” to see if there’s anything you want to change or add. Usually, you should always add a title and alt text.
Also, it will be a very good idea not to add an image bigger than the width of your widget area. So, for example, if your sidebar area is 350px in width, don’t add a 2000px image. Here you can read more about the importance of optimizing images for WordPress and how to do that.
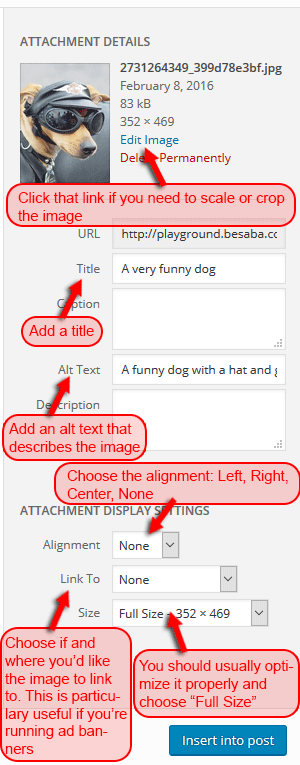
4. Press the “Insert into post” button.
5. Now the HTML code will appear in your Text editor. If you are in the Visual Editor, where you can actually see the image, then switch to Text.
6. Copy the code and go to your widgets (Appearance -> Widgets).
7. Now drag a text widget to your widget area/sidebar/footer.
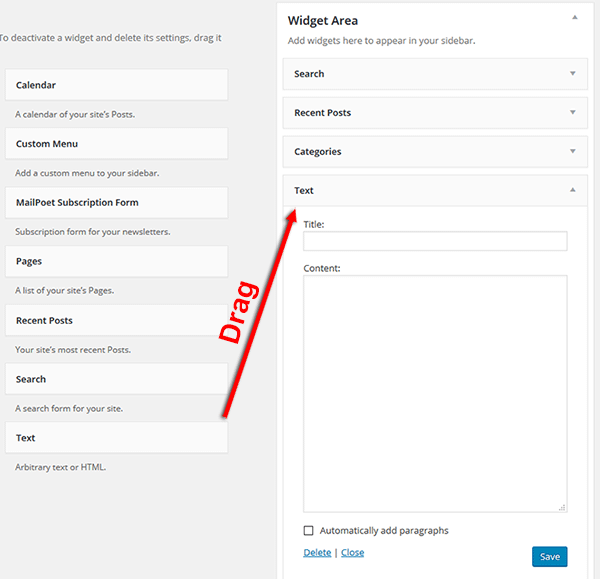
8. Add a title, if you wish, then paste the code into the content box. Press “Save” and check it out. The image should appear in your website’s widget area.
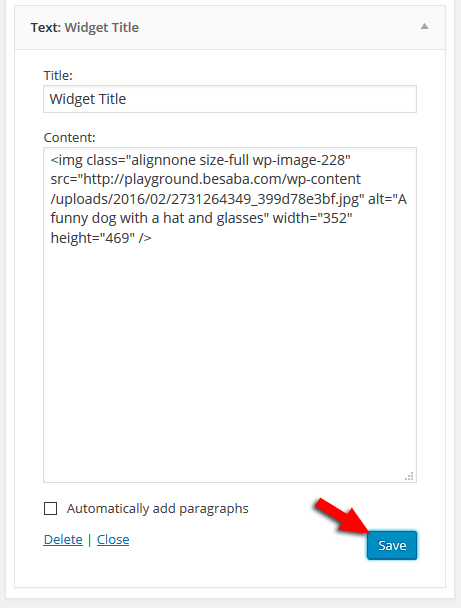
Now you can go and delete that draft post or page you’ve created in order to get the code.
Adding an image in a WordPress widget via a plugin
Using a plugin is obviously much easier, but it’s best to use as few plugins as possible. The more plugins you have, the more you’ll cluster your website, possibly causing more conflicts, slower loading time, etc. Therefore, we recommend using a plugin for something only if you really need to.
Anyway, here are a couple of plugins you can use:
Video tutorial (HD)
That’s a wrap
Hope you enjoyed this step by step guide on how to add an image in a WordPress widget.
If you have any questions or want to share your thoughts with us, please drop a comment, or even contact us through our form or Facebook page.


Super helpful!!! Adding a picture to the home page widget had me so frustrated.