Having incorrect permissions set for your WordPress files and folders can lead to several issues, such as images not appearing on your site, plugins not working properly, and so on.
So, in this tutorial, I’ll tell you which are the correct permissions, as well as how to set them using cPanel or an FTP client called FileZilla.
The Correct Permissions for WordPress Files and Folders
WordPress folders (or directories; however you wish to call them) should have 755 or 750 permissions. Usually, it’s 755 unless required otherwise.
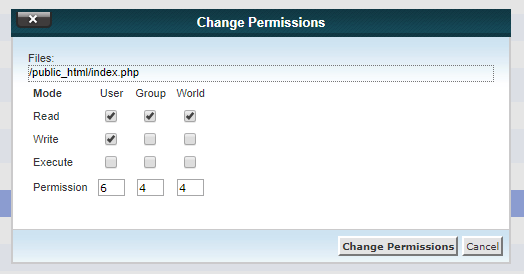
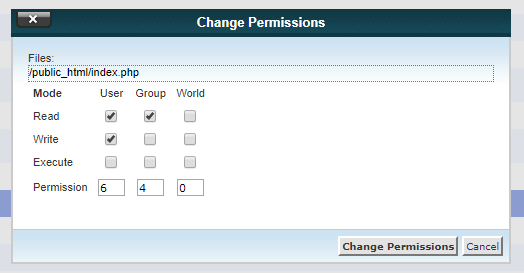
WordPress files should have 644 or 640 permissions. Usually, it’s 644 unless required otherwise.
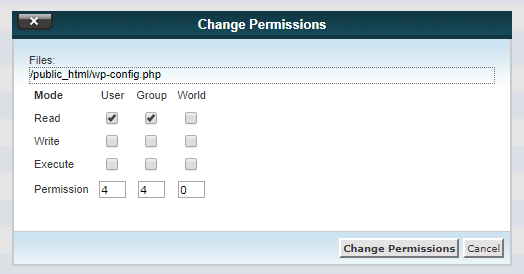
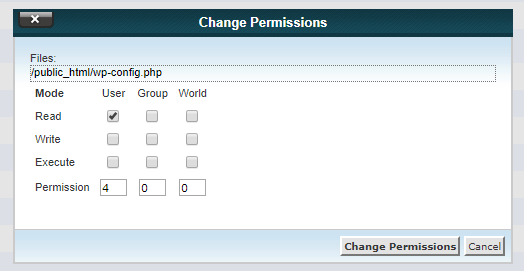
An exception is the wp-config.php file, which should have the permission set to 440 or 400 to prevent other users on the server from reading it.
If this will prevent something from working right, you can set it to 644 like the other files.
Change the Folder and File Permissions for WordPress Using cPanel
Step 1
Log in to your cPanel account and search for File Manager.

The cPanel appearance can differ from hosting to hosting.
Step 2
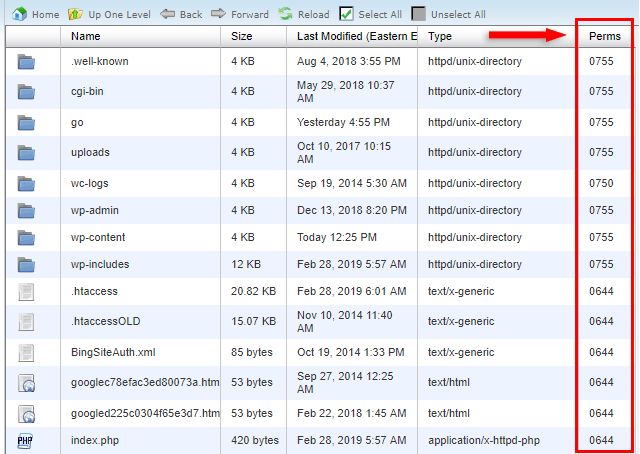
On the right side, you should have a Perms column, showing you the current set permissions for your WordPress files and folders.
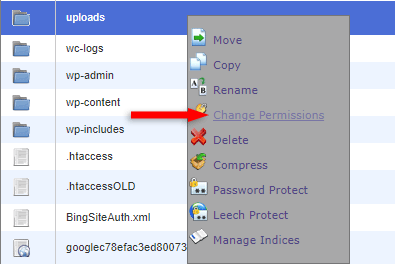
To change a permission, you just need to select a file or folder > right-click on it > select Change Permissions.
Step 3
Add the correct permission to your WordPress file or folder.
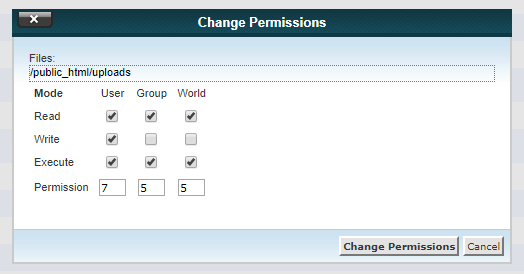
If your cPanel doesn’t have a feature where it lets you introduce the number directly, then you’ll need to check the boxes to generate the proper permission.
I’ll show you what boxes you’ll need to check to generate the right permissions.
For folders
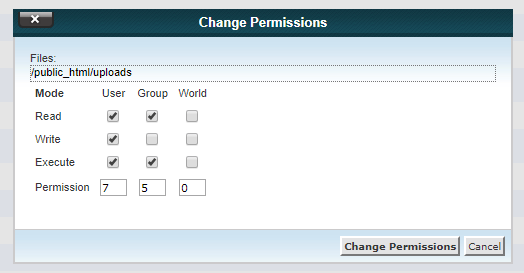
For files
For wp-config.php
Final step
Click the Change Permissions button and you’re done!
Check the Perms column one more time to make sure you set everything right.
Change the Folder and File Permissions for WordPress Using FileZilla
If you don’t have FileZilla, you can download it here.
You’ll need to know your FTP account information: Host, Username, Password, and Port.
If you don’t know where to get it from, ask your web hosting support for guidance, or read their knowledge base.
Step 1
Add your FTP account information in FileZilla and click the Quickconnect button.

The site’s files will appear on the right side, in the Remote site area.
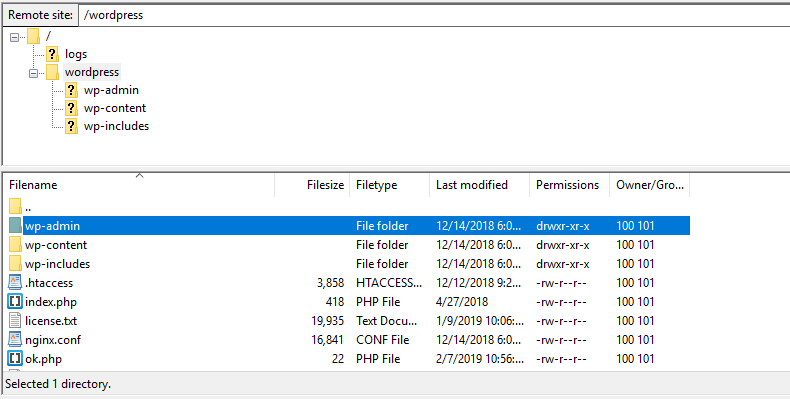
Step 2
Right click on a folder or file, then select File permissions.
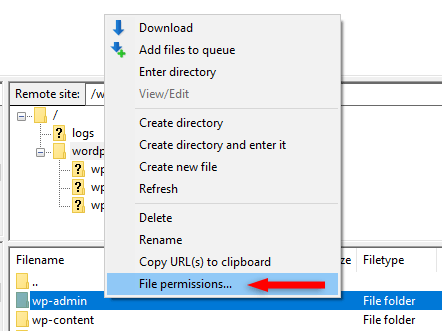
Step 3
Unlike some cPanel configurations, here, you won’t need to check the boxes to generate the correct file permission.
You only need to enter the number into the Numeric value field and FileZilla will automatically check or uncheck the boxes accordingly.
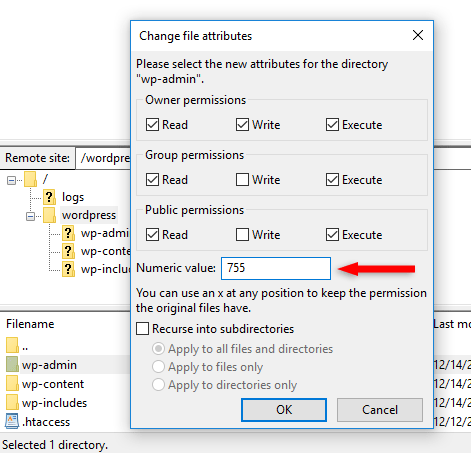
FileZilla also allows you to apply the changes to all files and directories, to files only, or to directories only.
This is a great feature in case you have incorrect permissions set for a lot of WordPress folders and files.
You only need to enable Recurse into subdirectories and then select the option that you need.
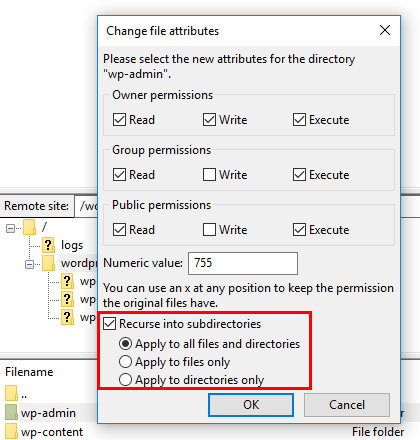
Final Step
Click the OK button after you made sure everything’s in order.
That’s a Wrap
I hope you found the post useful and comprehensive, and you managed to change the folder and file permissions for WordPress!
If you need help setting up your WordPress site, my WordPress services are at your disposal!
You can quickly subscribe to my newsletter by using this link.
You can also hit the follow button on Twitter and subscribe to the YouTube channel.
If you have any questions or thoughts, drop a comment or send a message via contact or Facebook page.
Don’t forget to share the post to help out others!
I’m trying to update my wp-config.php permissions to 440, but I’m getting a response that says 500 ‘SITE’ command not understood. Then after some time the status says “Disconnected from server: ECONNABORTED – Connection aborted.
Can you help me understand what’s going on here?