In a previous post, I’ve shown you how to properly buy a SiteGround WordPress hosting plan for your website or blog.
In this guide, I’ll show you how to buy a Hostgator WordPress hosting plan, which has become a decent alternative to SiteGround.
Until several months ago, HostGator wasn’t among my recommended WordPress web hosts, but they made some important changes recently: they improved their support and they finally offer free SSL (HTTPS) to all their shared WordPress hosting plans.
Let’s get to it!
How to buy a HostGator WordPress hosting plan
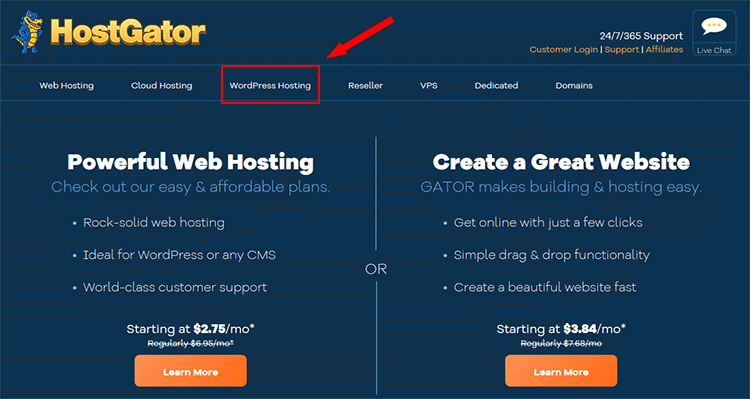
Step 1 – Go to the HostGator WordPress hosting section
Head over to HostGator and select the WordPress hosting section, not the regular web hosting!
Step 2 – Choose a HostGator WordPress hosting plan
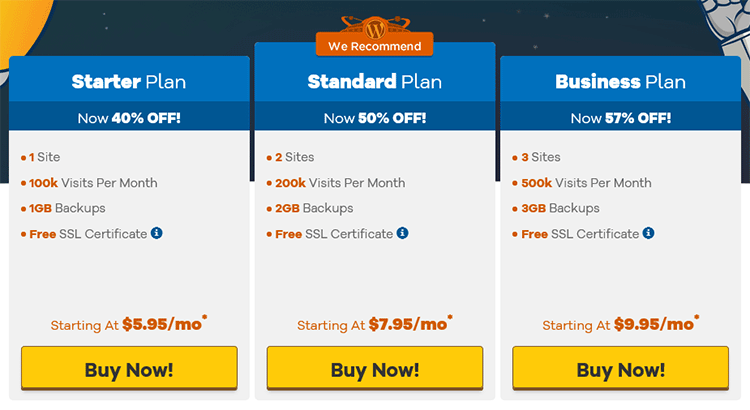
You’ve got 3 WordPress hosting plans: Starter, Standard, and Business.
Except for more resources, there’s no difference between the hosting plans, so pick one that fits your needs.
If you only got one WordPress website and you’re just starting out, then pick the Starter WordPress hosting plan.
Step 3 – Register or add your existing domain name

After selecting your HostGator WordPress hosting plan, you’ll be directed to the checkout process.
The first thing you’ll need to do is to either register a domain with them or add your existing one if you bought it from another domain registrar.
I normally recommend registering a domain name with the hosting company, if possible, because you’ll have everything managed in one place and you also won’t have to worry about changing Nameservers.
Registering a domain name with HostGator will cost you $15/year for a .com (prices differ depending on TLD).
But if you use this exclusive coupon code: themeskills, as you’ll see below at step 7, then you’ll get up to 60% OFF and $4.99 on selected domains!
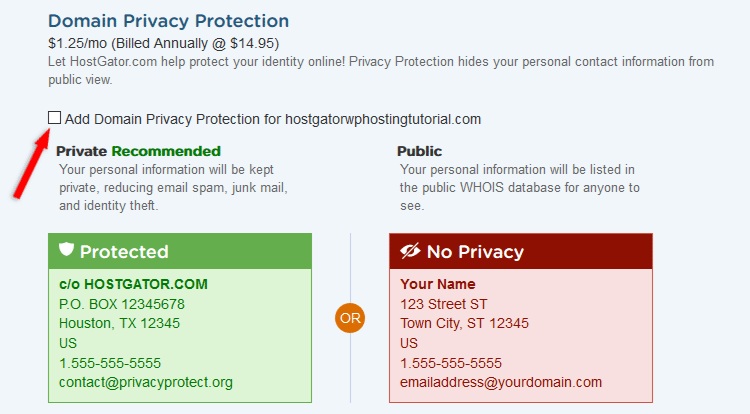
If you also want Whois privacy protection, so that your personal information won’t be made public, then you’ll have to pay an extra $14.95/year.
If you want to save even more money, then you can go to NameCheap and see what offers they have.
You will definitely save $14.95/year because NameCheap offers free Whois privacy protection for all domains!
Now, let’s say you register a domain name with HostGator. The checkout process will be the same in both cases!
After adding your domain name, it will show you if it’s available or taken, and it will also show you other TLD alternatives.
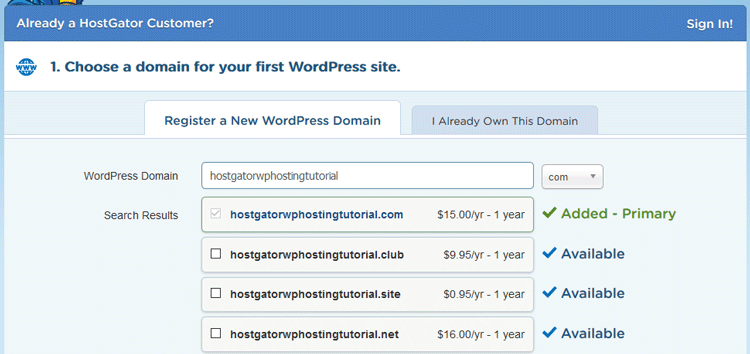
The example domain I added (hostgatorwphostingtutorial.com) is available, as pointed out by the green check mark.
At the bottom of the domain list, you’ll also have the Domain Privacy Protection feature checked by default.
Uncheck it if you don’t want it.
Step 4 – Choosing the billing cycle
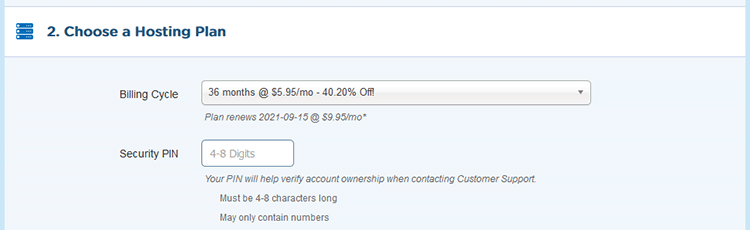
At the time I’m writing this guide, a billing cycle of 36 months is selected by default, which will cost around $243 in total. So, be careful!
This might be because they seem to have an offer going on, which saves you 40% off the normal price.
I don’t know if this is one of those permanent offers or it will expire.
Things always change, so make sure you keep an eye out.
So, if you want to change your billing cycle, do it from there.
Also, choose a 4-digit PIN number which will help you verify your account when you contact support for help.
You might want to note that PIN number down and keep it safe.
Step 5 – Enter your billing info
This part doesn’t need any special mentions. Just go ahead and enter your billing information.

Step 6 – Add additional services
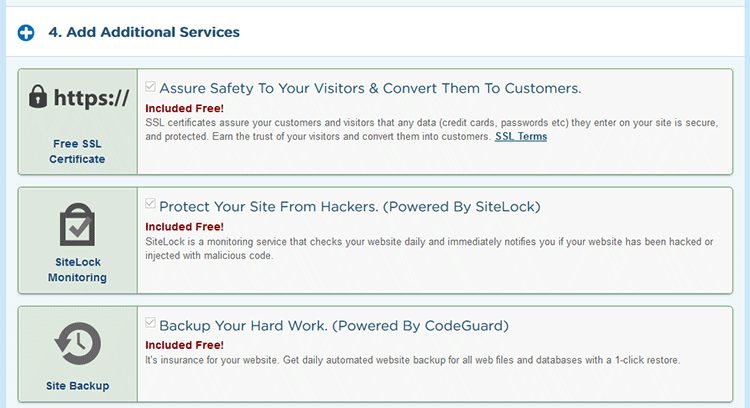
Here, you can usually add extra features, but at this time, they seem to be free!
You get:
- Free SSL certificate (HTTPS);
- WordPress website security powered by SiteLock;
- Automatic daily backups powered by CodeGuard.
Step 7 – Add a coupon code

HostGator might add a coupon code automatically, but if you have a better one, such as themeskills, add that one. :)
With the themeskills coupon code, you’ll get up to 60% OFF and only pay $4.99 for the selected domain.
Step 8 – Review your order
Check to see that everything you selected is in order and if you are ok with the total cost.
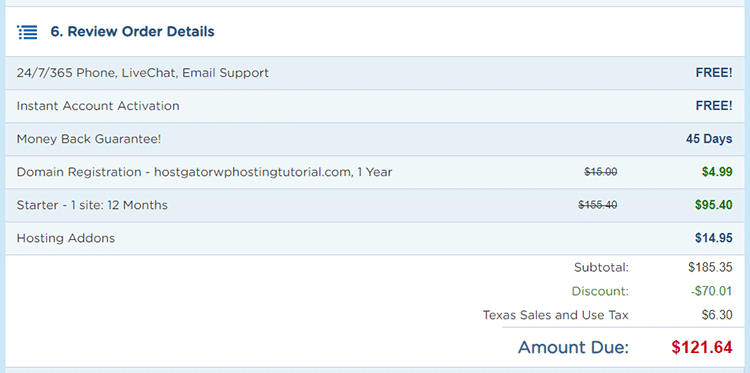
As you can see, if you purchase a 12-month HostGator hosting Starter plan for WordPress using the themeskills coupon code, a total cost of $121.64 will be billed.
Note that the price can differ a bit depending on what taxes apply in your country.
Step 9 – Checkout and enjoy!
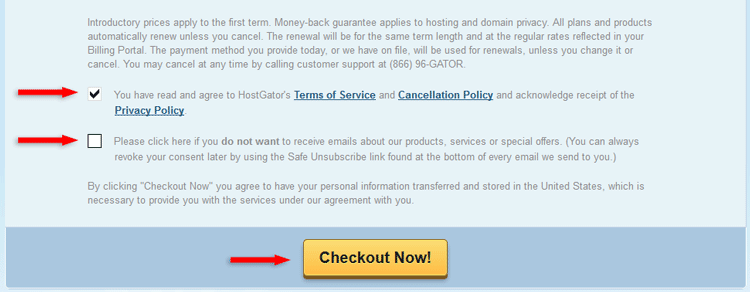
Agree with their terms and privacy (if you wish; otherwise look for another WordPress hosting :P ), and also select if you do not want to receive newsletters from HostGator.
Then, press the Checkout Now button to activate your account and start creating your WordPress website or blog.
Other essential things needed to create your WordPress website
Purchasing a WordPress hosting plan is just the start.
Here are other essential things you’ll need to create a WordPress website or blog.
You can also check this hefty list of WordPress resources and my WordPress website’s blueprint to see what I’m using to run ThemeSkills.
That’s a wrap
Hope you found this guide useful and comprehensive, and you managed to successfully buy a HostGator WordPress hosting plan for your website or blog!
Don’t forget to share the post to help out others!
You can quickly subscribe to my newsletter by using this link or the subscription form.
If you have any questions or thoughts, drop a comment or send a message via contact or Facebook page.
You can also hit the follow button on Twitter and subscribe to the YouTube channel.
If you want to start your own WordPress blog, or need a website for your business, my WordPress setup service is at your disposal!
On-going WordPress support and maintenance are on the menu as well!

Leave A Comment