I’ve been using SiteGround’s WordPress hosting for years to host ThemeSkills and other projects, and it’s my top recommendation to clients who are just starting out, or are on a budget, or won’t get mad traffic in the near future, or all of the above.
I’ve wanted to write this guide because most of my clients got confused a bit when they were trying to buy a WordPress hosting plan from SiteGround, as many beginners in this area do, I believe.
Not because it’s a complicated thing to do, but because there are some particular options that you need to choose from, and it can be confusing for some.
Making a wrong choice can lead to some hassle in the future – if things need to be changed.
How to buy a SiteGround WordPress hosting plan
Let’s see, step by step, how to do this.
Step 1 – Choosing the right SiteGround hosting type
Make sure you choose the WordPress hosting, not the regular one. Or use this link to go there directly.
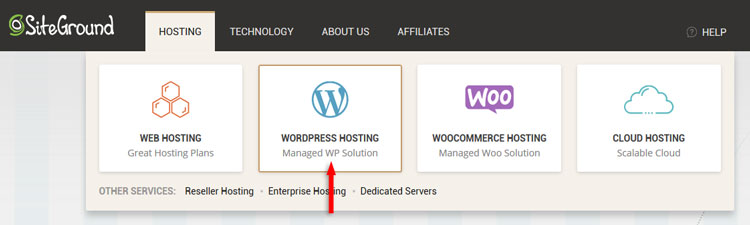
Step 2 – Choosing the right SiteGround hosting plan
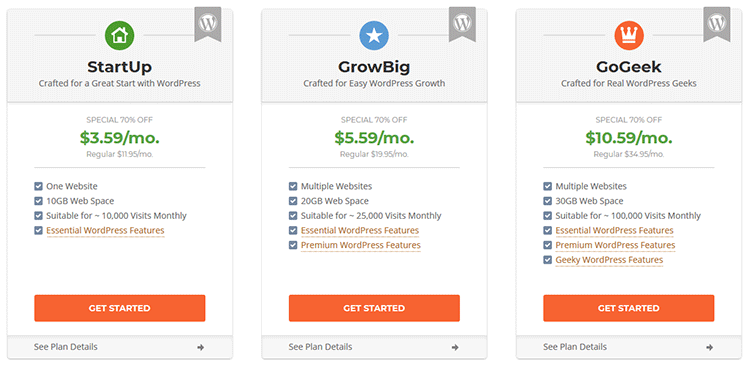
Choose one of SiteGround’s WordPress hosting plans.
I recommend buying the GrowBig or GoGeek plan because the StartUp plan lacks some important features that I’ll point out below.
In addition to the StartUp plan, the GrowBig plan offers:
- Free WP transfer – If you need to transfer your WordPress site from another hosting;
- Priority technical support;
- WordPress SuperCacher – This is very useful. It’s SiteGround’s own caching system, which works in combination with the SG Optimizer plugin. It does a good job at speeding up your WordPress website if you’ll have a light and optimized one;
- Free backup restores – Another important and useful feature.
GoGeek offers everything the other two packages offer, plus (I’ll only point out two):
- 1-click WordPress staging – You can create a copy of your WordPress website where you can test updates or major changes, therefore preventing issues or downtime on your live site;
- Fewer accounts on the server – This means that the server hosts fewer websites, which means more resources for everyone else.
You can see a big list of all the plans compared here.
Step 3 – Choosing a domain
After you choose a WordPress hosting plan and press the ‘Get Started’ button, you’ll have to register a new domain or add one that you already have.
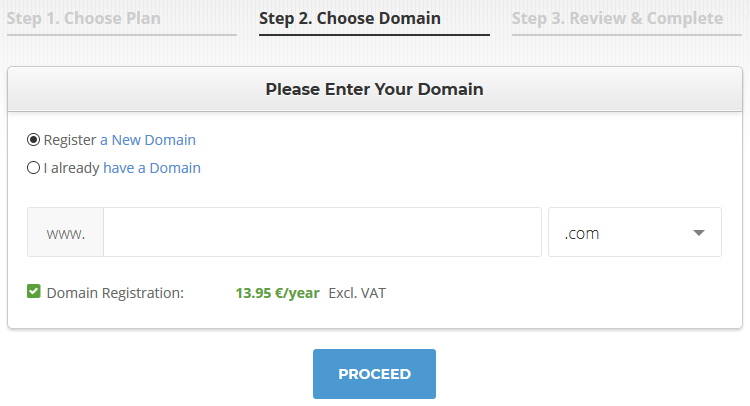
Either you are registering a new domain or you add an existing one, the buying process will be the same.
If you don’t have a domain, I recommend registering one with SiteGround because you’ll have both hosting and domain under one account.
You’ll also skip the part where you have to switch Nameservers if you have a domain registered somewhere else.
But if you want to save some money when registering a domain, then check NameCheap.com and see if they have some good offers.
NameCheap also offers free Whois privacy protection for every domain, so you’ll save up to 24$/year there.
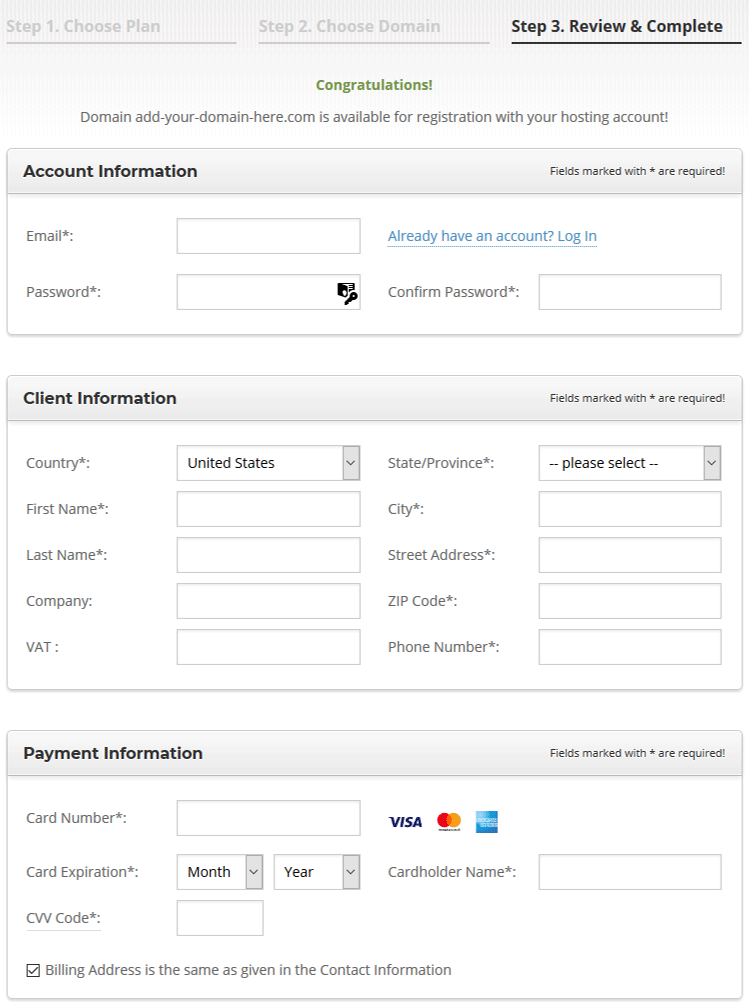
Step 4 – Finish the buying process
After you added your domain, you’ll be directed to the checkout page.
Add your account, client, and payment information.
Now, here comes the part where I said that it can be confusing for some people. You’ll have some options to choose from.
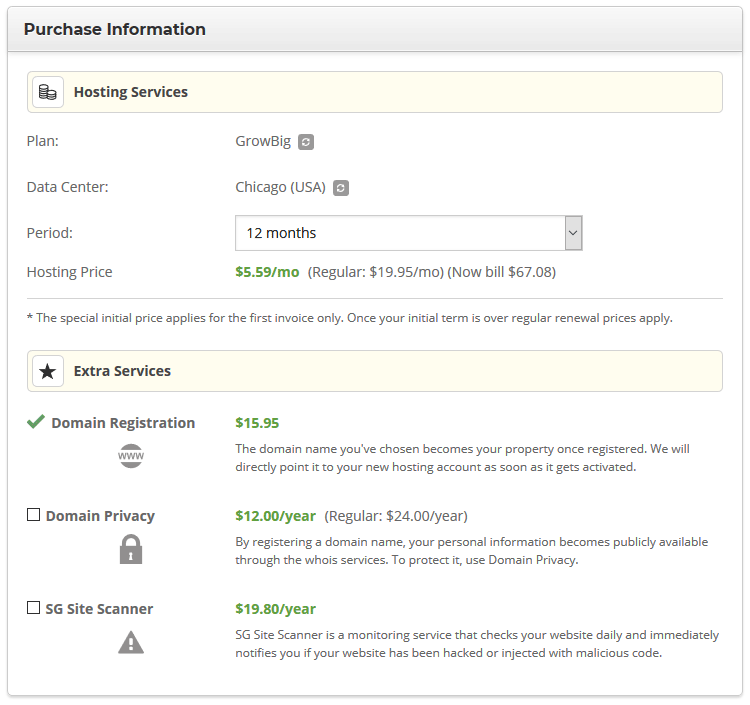
Plan
If you chose the wrong WordPress hosting plan or changed your mind and want another one, you can change it from there.
Data Center
This is very important!
SiteGround has 4 data centers on 3 continents (Europe, Asia, North America). Choose one that’s the closest to your audience.
For example, if your website/business focuses on a certain European country or on the entire Europe continent, then choose a data center from Europe: Amsterdam or London.
Same applies to the rest.
If your WordPress site focuses on a U.S. audience, but your data center (server) is in Europe, then it will take longer for your website to load for the U.S. visitors, simply because the distance between the server and end user is bigger.
If you make a mistake, you can request to be moved to another data center, but it won’t happen instantly, and you can experience some downtime. It will also cost you extra!
If your WordPress site will be international, then the best idea is to select the data center that’s in U.S. (Chicago).
Ideally, if a website is international, a CDN (Content Delivery Network) should be used (Cloudflare, KeyCDN, StackPath, etc.).
Domain Privacy
Check this if you want to have Whois privacy protection, meaning that if someone looks up your domain, your personal information won’t be shown.
SG SiteScanner
This also very important and I recommend purchasing it as well.
It’s SiteGround’s malware scanner that scans your WordPress website for malware on a daily basis.
This malware scanner is powered by Sucuri, one of the most respected security companies.
Step 5 – Enjoy
That’s it!
Now you can start building your WordPress website!
Here are other essential things that you’ll need for your WordPress website.
If you need help in choosing the right resources (themes, plugins, tools) for your WordPress website, then check my website’s blueprint and this ultimate WordPress resources list!
That’s a wrap
Hope you found this guide useful and understood how to buy a SiteGround WordPress hosting for your website or blog.
Don’t forget to share the post to help out others!
You can quickly subscribe to my newsletter by using this link or the subscription form.
If you have any questions or thoughts, drop a comment or send a message via contact or Facebook page.
You can also hit the follow button on Twitter and subscribe to the YouTube channel.
If you want to start your own WordPress blog, or need a website for your business, ThemeSkills’ WordPress setup service is at your disposal! On-going WordPress support and maintenance are on the menu as well!


Leave A Comment