At some point, you’ll most likely want to make some customizations to your WordPress website: changing a background color, adding some more padding, changing the font size, etc.
I see a lot of people on the WordPress forum asking for design changes, which require custom CSS, but most of them don’t know how to add it.
So, in this article, I’ll show you 5 different ways to add custom CSS to your WordPress website.
If you need help in finding a CSS class or id as well, then read this tutorial.
1. Adding custom CSS via Additional CSS
This is the easiest and fastest way, and everyone who has WordPress 4.7+ has access to it.
What you need to do is to:
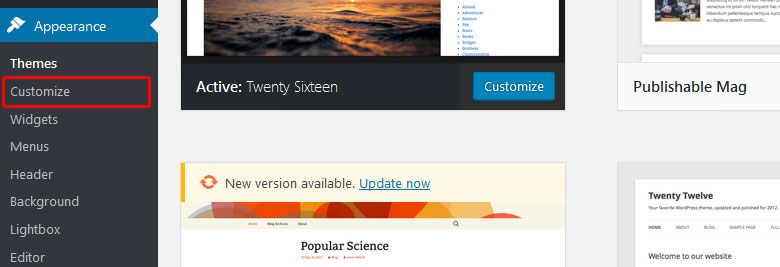
1. Go to Appearance -> Customize. You should also be able to access “Customize” from the top of your admin bar when viewing a page;.
2. Click on Additional CSS.
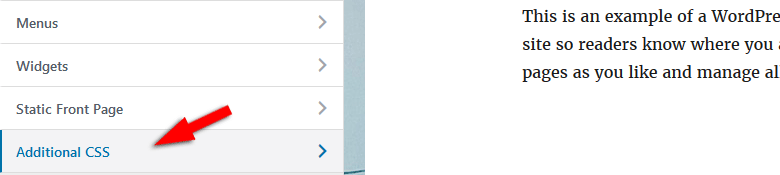
3. Enter your custom CSS code on the left.
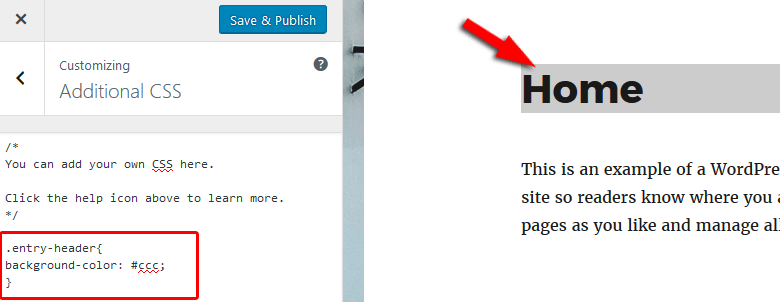
And that’s it! If the code worked, you’ll notice the change in real-time.
As you can see in my example, I added a gray background to the entry header.
In order for that change to remain, you have to click the Save & Publish button.
You can also check our video tutorial below.
2. Adding custom CSS via Theme Options
Most themes come with a Custom CSS box in their settings, where you can add your code, as you saw above.
In most cases, you can find your theme’s settings by going to Appearance -> Theme Options.
A lot of themes nowadays have started to implement their settings into WordPress’ “Customize” feature, so there will be no separate theme options.
3. Adding custom CSS via Theme Editor
WordPress has another built-in feature, called “Editor”, where you can edit your theme files. You’ll find it by going to Appearance -> Editor.
Once there, you need to add the CSS code in your style.css file.
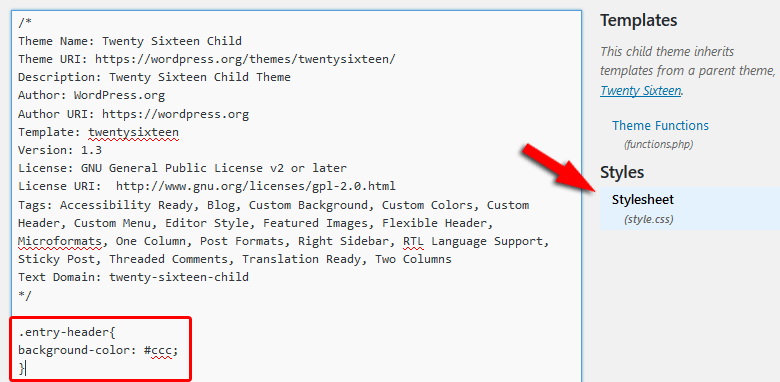
I strongly recommend that you use a child theme and edit the child theme’s style.css file, otherwise your changes will be lost with the next update.
Also note that you might have some security tweaks, especially if you’re using a security plugin, such as iThemes Security, that have an option to disable the “Editor” part, so you won’t be able to edit your files from within WordPress.
You can also check our video tutorial below.
4. Adding custom CSS via FTP
This is a bit more advanced because you need to access your files via FTP.
Once you’ve accessed your FTP, you need to go to public_html/wp-content/themes/your-theme-name-child/style.css.
Then you just add your code in that file, like you’ve seen above. Save, and you’re done!
5. Adding custom CSS via plugin
I really don’t recommend using a plugin for this, especially when you have 4 other options, the first 3 being very easy.
The fewer plugins you have, the better, so if a plugin isn’t really necessary, you should avoid using it.
But if you still wish to install a plugin for this, then I’ll recommend one: WP Add Custom CSS
WP Add Custom CSS is a simple, yet flexible plugin. It lets you add custom CSS to the whole website or to individual posts, pages and custom post types (such as Woocommerce products).
That’s a wrap
Hope you found the post useful and comprehensive!
Don’t forget to share it with your friends!
If you have any questions or thoughts, drop a comment, contact us, or leave a message on our Facebook page.
Leave A Comment