
By default, once you publish a WordPress page or post, it will be visible to the entire public.
In case you just want certain people to see the content of a post or a page (e.g. friends, subscribers, premium members, etc.), you can password protect it using the built-in feature offered by WordPress.
Read this post if you want password-protect your whole WordPress website to prevent search engines from indexing it or users from seeing it.
Click here if you want to jump to the video tutorial.
How to password protect a WordPress post or page
I’ll just show you an example of how to password protect a page because the process is exactly the same for posts.
What you need to do is to:
- Go to Pages -> All Pages.
- Select the one that you want to password protect, or create a new page.
- Now, on the right, you’ll see an option called Visibility, which will be set to Public, by default. Click on the Edit link that’s next to it, choose Password protected and insert a password in the box.
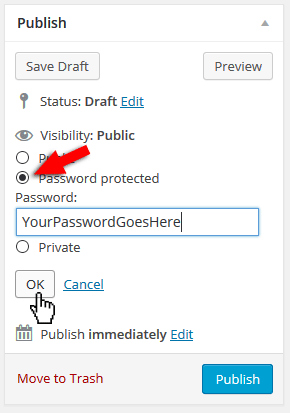
- Press OK.
- Then press the Publish button (Update if the page was already published).
That’s it! Now only the people who have that password can see the content of the page.
Let’s see how that page will look like:
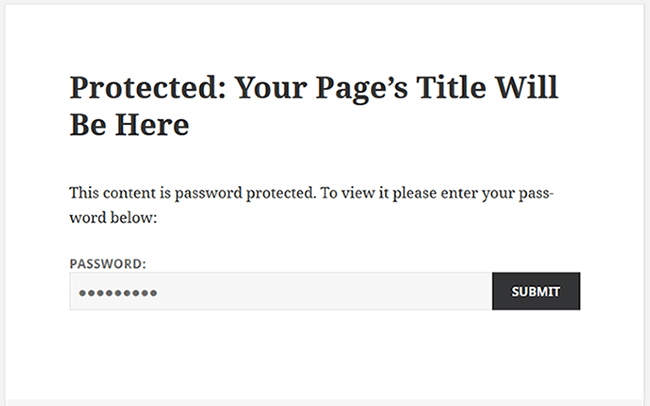
Of course, the appearance will be different, depending on your theme’s design, but the text will be the same.
Some of you may want to change the text, so I’ll show you how to do it!
How to change the password protection text
Usually, this works just fine, but it could also break some sites! I strongly suggest asking for help, if you’re not familiar with this! Or at least backup the file before editing it!
The default form contains the following text: “To view this protected post, enter the password below:”, as you’ve seen in the above image.
In order to change it, paste this code at the bottom of your theme’s functions.php. I recommend you use a child theme.
function my_password_form() {

global $post;

$label = 'pwbox-'.( empty( $post->ID ) ? rand() : $post->ID );

$o = '<form action="' . esc_url( site_url( 'wp-login.php?action=postpass', 'login_post' ) ) . '" method="post">

' . __( "To view this protected post, enter the password below:" ) . '

<label for="' . $label . '">' . __( "Password:" ) . ' </label><input name="post_password" id="' . $label . '" type="password" size="20" maxlength="20" /><input type="submit" name="Submit" value="' . esc_attr__( "Submit" ) . '" />

</form>

';

return $o;

}

add_filter( 'the_password_form', 'my_password_form' );
Now, change To view this protected post, enter the password below: with whatever you like, then update/save the file.
Example:
function my_password_form() {

global $post;

$label = 'pwbox-'.( empty( $post->ID ) ? rand() : $post->ID );

$o = '<form action="' . esc_url( site_url( 'wp-login.php?action=postpass', 'login_post' ) ) . '" method="post">

' . __( "This page is for subscribers only! If you're a subscriber, please enter your password below:" ) . '
<label for="' . $label . '">' . __( "Password:" ) . ' </label><input name="post_password" id="' . $label . '" type="password" size="20" maxlength="20" /><input type="submit" name="Submit" value="' . esc_attr__( "Submit" ) . '" />

</form>

';

return $o;

}

add_filter( 'the_password_form', 'my_password_form' );
Let’s see if the text has changed!
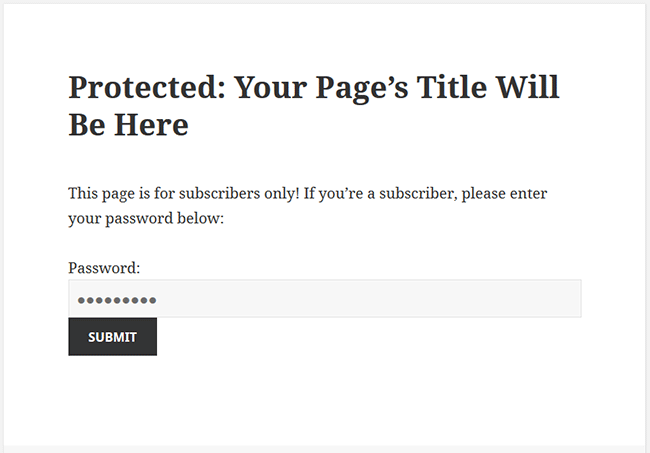
Yep, it has!
This code comes with a slightly different HTML structure, that’s why the “Submit” button went under the password box, but it looks fine like that too. I had to add a blank space before <label for ..., though, otherwise, there wouldn’t have been any space between the word “Password” and the text, making it look a little bit ugly.
Video tutorial (HD)
That’s a wrap
Now you know how to password protect a WordPress page or post, and how to change the default text as well!
Hope you enjoyed our post and found it useful! Don’t forget to share!
If you have any questions or thoughts, please drop a comment or contact us via our form, Twitter, or Facebook!

Hello,
I am having issue in password protect pages. After I enter password, pages goes blank in chrome,IE and safari browsers. But after a lot of research and trying your code, I got the issue resolved in Chrome browser. But in Safari and IE browsers still the page goes blank on entering the password.
Kindly help me ASAP to resolve this issue.
Thank you
Hello!
Sounds like a conflict is happening somewhere, most likely with a plugin. You need to disable them in order to see if that solves the issue. If it does, enable them one by one and try the page to see which one is the culprit. Make sure that you perform a full backup before disabling your plugins.
If you disable the plugins, but it’s still happening, then switch the theme to a default one from WordPress (e.g. TwentySeventeen). Check again.