
This post was last updated on 12/29/2018 to include guidance for the Gutenberg editor.
Adding a border to images can improve the appearance of your WordPress posts, especially if your blog is on a white background.
I’m writing WordPress tutorials and guides, therefore using a lot of screenshots, but most of the screenshots that I take also come on a white background.
So, adding white screenshots on white blog posts can look pretty bad and confusing for the readers since, sometimes, they can’t tell right away if those are screenshots or it’s just part of the text.
So, in this tutorial, I’ll show you how to improve the appearance of your blog posts by simply adding borders to images. I’ll also show you how to customize them at the end of the tutorial.
I won’t use a plugin, just some simple CSS code that you can easily add yourself.
There’s no need for plugins for simple things. The fewer plugins you have, the better!
I didn’t find any updated plugin anyway, so you don’t have much of a choice :) .
How to add a border to images in WordPress posts
I’ll show how to add a border to all of your images or for specific images.
1. Add a border to all of your posts’ images
In order to add a border to all images in your WordPress posts, you’ll have to add the following CSS code:
.post .entry-content img {border: 1px solid #000000;}
Here are 5 ways to add CSS code in WordPress.
So, I added the .post class which only focuses on posts, not pages. Then I used the .entry-content class to prevent the featured image to be included as well, as you can see below.
Note that the .entry-content class should work on most themes, but some might use another class.
For example, Avada (this is an affiliate link), my website’s theme, uses a different class: .post-content.
In order to find out your theme’s particular CSS class, do the following:
- Go into one of your posts;
- Right-click on the first row of the first paragraph and select Inspect or Inspect Element (depends on the browser);
- Now, when the inspection box opens, the first paragraph (
<p>...</p>) should be highlighted in dark blue. Slowly move your cursor up a bit until you hit the class that makes the whole content – starting from under the featured image – to become highlighted with a blue-ish overlay.
Write down the class and replace .entry-content with it in the above CSS code.
2. Add a border to specific images
If you don’t want to add borders to all images, but only to one or two from time to time, you can do this using two methods.
Method 1 – Using a CSS class
Create a class and add it in WordPress using one of the methods pointed out in the link above. The most practical way is to use the Additional CSS feature (Appearance -> Customize -> Additional CSS).
So, add this class, for example:
.my-img-border {border: 1px solid #000000;}
You can come up with another name if you wish.
Now, every time you want to add a border to an image, add this class to it after it’s uploaded: my-img-border (no dot, no properties, just the class name).
You can add the class in different ways:
A) Via Classic Editor > Visual editor
Step 1 – In the Visual Editor, click the image, then click on the Edit icon (pencil).
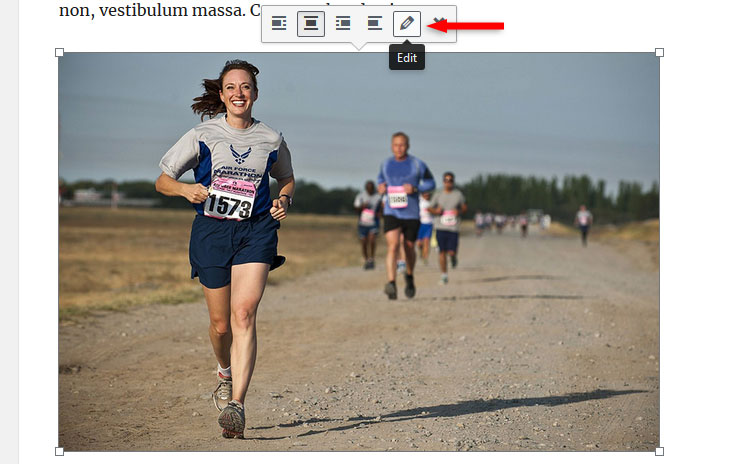
Step 2 – Add the class name (my-img-border) in the Image CSS Class field, under Advanced Options.
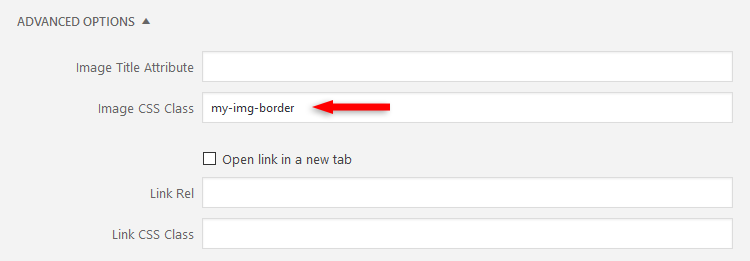
Step 3 – Press the Update button in the bottom-right corner.
Now only that particular image has a border around it!
B) Via Classic Editor > Text editor
If you’re using the Text Editor like I do, you can add the class inside the <img> tag.
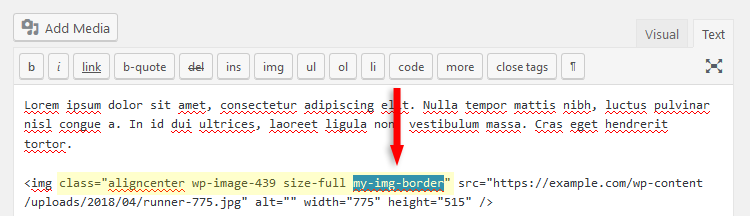
As you can see, I added it next to the other existing classes that WordPress adds by default.
If there aren’t any classes added already, which is unlikely, you can just add class="my-img-border" inside the <img> tag.
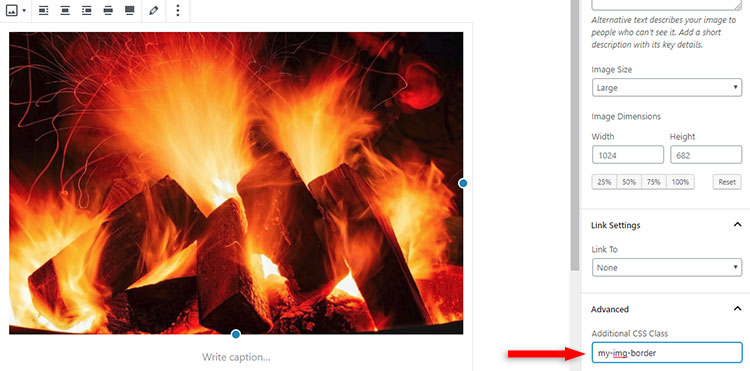
C) Via Gutenberg
If you’re using the Gutenberg editor, then you can select the image block and add a class in the right sidebar, under Advanced.
Method 2 – Using inline CSS
Inline CSS means that you can add some CSS styles directly into the HTML tag, like this:
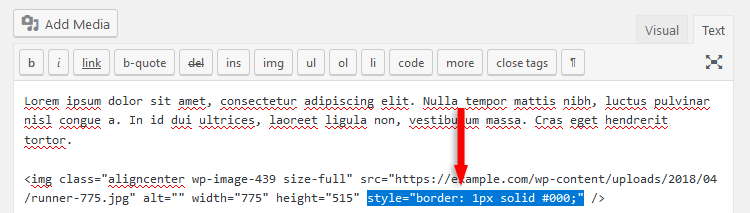
In the Classic Editor
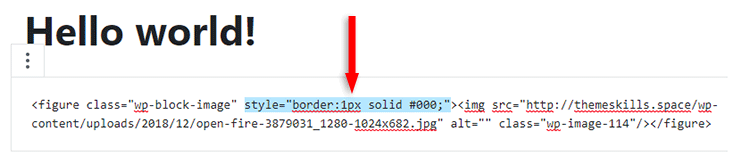
In Gutenberg > click 3 vertical dots > Edit as HTML
As you can see, I added the following code to the <img> tag (Classic Editor) or <figure> tag (Gutenberg):
style="border:1px solid #000;"
#000 instead of #000000 works too.
When doing so, there’s no need to use a CSS class like you saw in the first method.
This method shouldn’t really be used unless you plan on adding image borders on very rare occasions. It’s not a practical method, especially if you also want to add some padding, margins, and other styling properties.
How to remove a border from a specific image
This is used if you add borders to all images in your WordPress posts, but you might want to exclude some of them at some point.
For example, I have an ad banner at the bottom, and I don’t want it to have a border.
So, what to do in cases like this?
Well, create a CSS class and add it in WordPress like you saw above. Let’s name it .no-img-border.
So, add something like this:
.no-img-border{border:none;}
Now, when you upload an image that you don’t want to have a border, use the no-image-border class just like you saw in the above methods.
How to customize the image border
What I provided is just a basic example of a border, but you can easily change its style.
Instead of ‘solid’, you can add ‘dotted’, ‘double’, ‘dashed’, and others. You can see more here.
You can change the size from 1px to 2px, 4px, and so on.
You can also change the color by using whatever hex color (e.g. #eeeeee) you want. You can use this tool to generate a hex color for your border.
Here’s an example of a different border style:
.my-img-broder{border: 2px double #bfbfbf;}
Things to look out for when adding classes
1. Choose a more original name
Make sure you pick a name that sounds pretty unique, so you won’t interfere with the ones used by the theme developers, thus creating conflicts.
For example, .image-border could very well be used by some themes.
But if you choose something more original, like .my-img-border or .cool-black-img-border, it’s less likely to be used by the theme.
2. Add !important if changes don’t take place
If the changes don’t take place, consider adding !important when creating the CSS class.
Example: .my-img-border{border: 1px solid #000000 !important;}
This will force an override for the theme’s property.
Also, clear your browser and site cache.
That’s a wrap
Hope you found the post comprehensive and you’ve understood how to add a border to images in WordPress posts.
Don’t forget to share it to help out others!
If you have any questions or thoughts, drop a comment or send a message via contact or Facebook page.
You can also hit the follow button on Twitter and subscribe to the YouTube channel.
If you want to start your own WordPress blog, or need a website for your business, ThemeSkills’ WordPress website service is at your disposal! On-going WordPress support and maintenance is on the menu as well!
You can also purchase a ready-made WordPress website with hosting and support included!

In Guttenberg, the image class gets applied to the div instead of the figure or img. So the border doesnt get applied.
Solution is change the following
.my-img-border{border: 1px solid #000000 !important;}
to the following
.my-img-border img{border: 1px solid #000000 !important;}