Optimizing images for your WordPress website is very important. You need to get them to the proper dimensions and also make the size of the files as small as possible.
The most common software when it comes to images is Photoshop, but since it can be complicated for most of you, and you also have to pay for it, I’m going to recommend you a very good alternative, which is GIMP.
GIMP is a free image manipulation software, which is used for image editing, retouching, drawing, etc., and in this article, I’ll show you how to use it for your WordPress website.
Finding out the proper dimensions of an image
First things first, you’ll need to find out what are the proper dimensions of the image that you want to add.
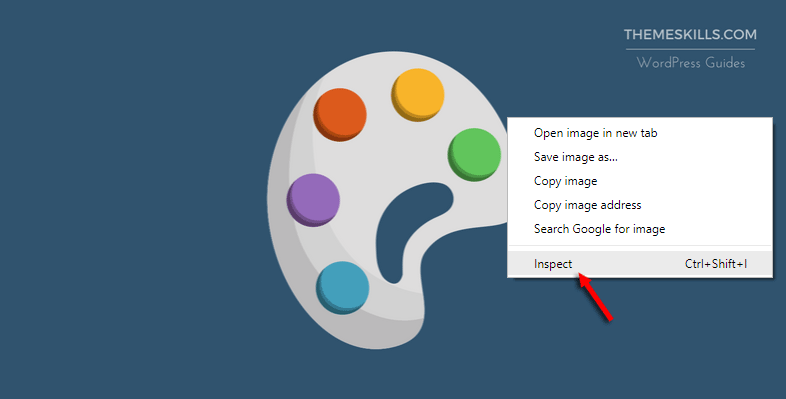
I’ll use one of our post’s Featured image as an example.
The simplest way to do this is to use your browser’s Inspect / Inspect Element (depends on the browser) feature. I’ll use Chrome because it’s the most common browser.
What you need to do is to right-click on the image, and then press Inspect.
After that, you’ll immediately see the image’s size at the top.
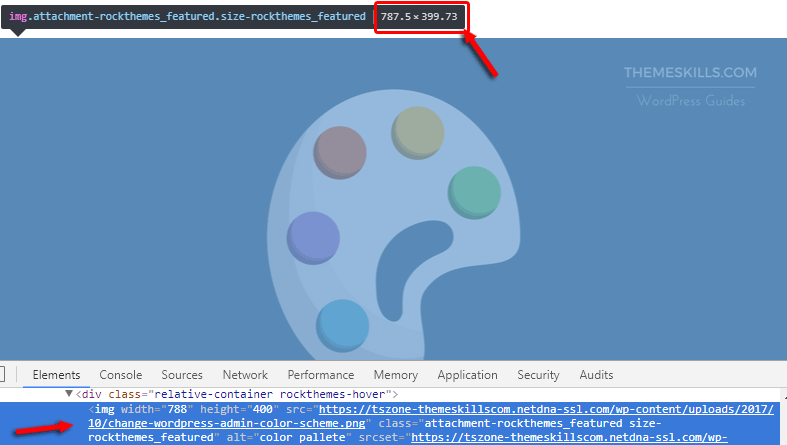
If it somehow doesn’t show, just hover your mouse cursor at the bottom, over the part that’s highlighted in blue.
Optimizing images with GIMP for your WordPress website
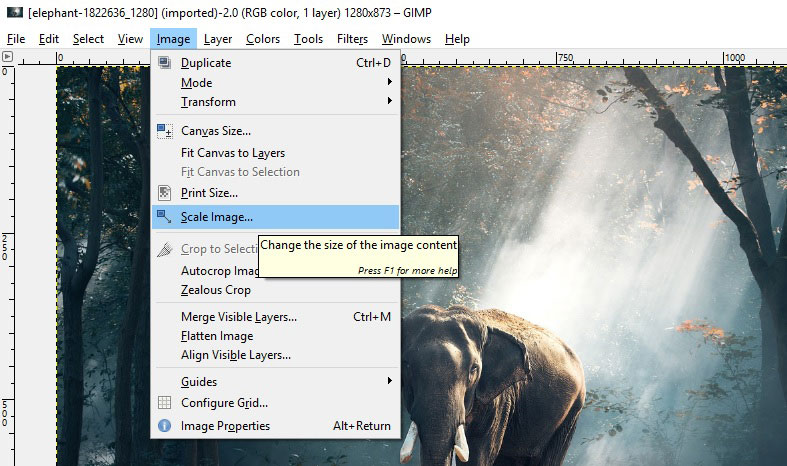
I’ve downloaded a copyright free image from Pixabay, which has the dimensions of 1280×873 and a file size of 354 KB.
Even though the theme will automatically scale down the image to the designated dimensions, the file size is still too big, having 345 KB. It will unnecessarily occupy more space and “eat” bandwidth, and it will also increase the size of the web page, and the bigger the web page, the bigger the loading time.
Note: Unlike the width, which is set to have the same dimension (at least for Featured images), the height can differ. Some themes let you choose the height, some add fixed heights and your image will get cut off if it’s too big, or stretched if it’s too small. For our featured images, I’ve chosen a height of 400px.
Let’s get to work!
Step 1. The first thing I’m going to do after opening my image in GIMP (File -> Open) is to scale it down by adjusting the width. To do that, I’ll go to Image -> Scale Image.
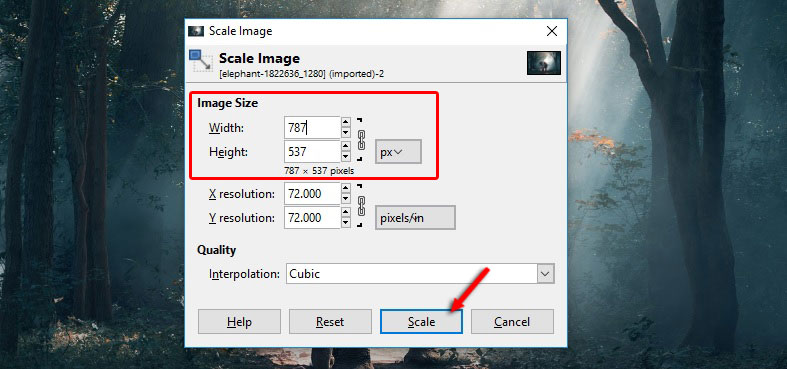
Step 2. Now, in the Width field, I’m going to add 787px (I rounded it up from 787.5 px) and press Enter.
After pressing Enter, the Height will automatically scale down to properly constrain the proportions. In my case, it’s 537px, but that’s larger than the 400px height I want for my featured images.
I like having the same dimensions for every featured image because it looks better.
Step 3. Since the height is too big, I’ll have to crop the image.
In order to do this, I’ll go to Tools -> Transform Tools -> Crop.
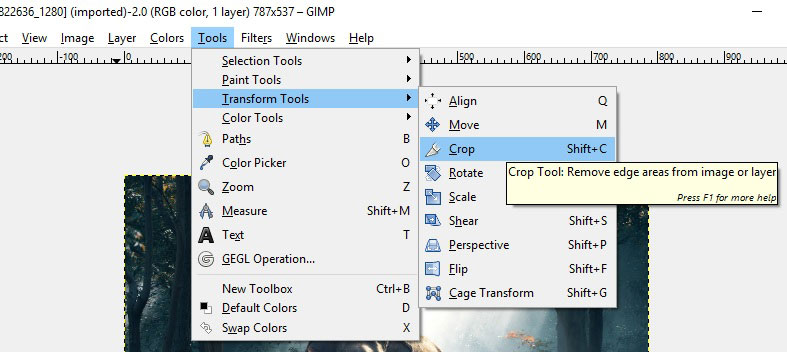
Now I’ll choose a corner, then click (hold) and drag in order to crop a rectangle that has my desired height, 400px. Enter for the changes to take effect.
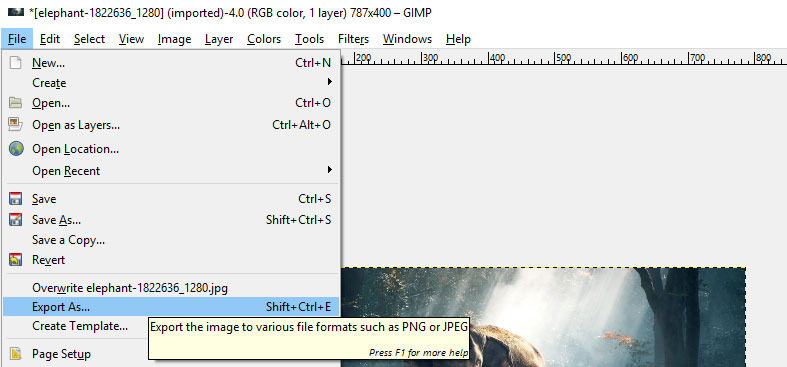
Step 4. The image now has the proper dimensions, but I can still further decrease the file size, without affecting the quality.
I’ll proceed with saving the image by going to File -> Export As (not Save As).
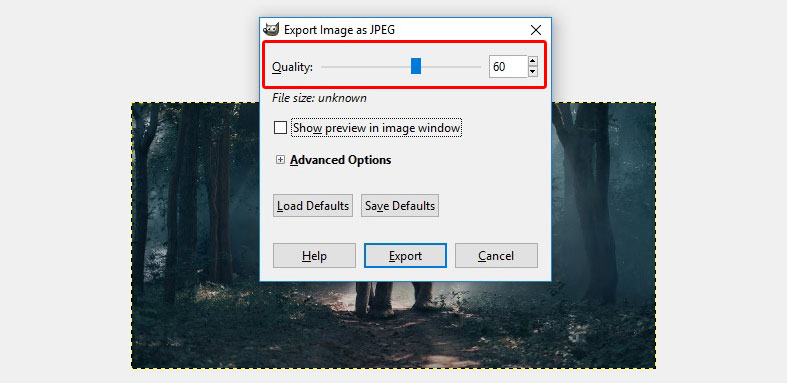
After choosing the location, file type, file name, and pressing Export, a pop-up window will appear. I’ll set the Quality to 60 and press Export again.
Now the image has the proper dimensions, and the file size is just 42 KB, down from 354 KB! See how much space is saved by just optimizing one image?
If I wouldn’t have set the Quality to 60, the file size would have been 329 KB, so I’d have only saved 25 KB, instead of saving 312 KB!
And no, if you set the Quality to 60, the actual image quality won’t be visibly altered; you can’t see the difference with the naked eye, as you can notice from the comparison below.
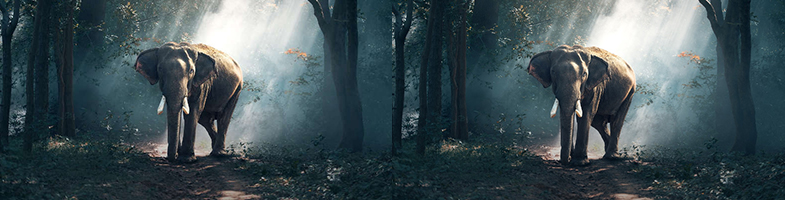
Can you tell which one has the Quality set to 60 and which one has the original quality? I doubt it, so I’ll tell you.
The one on the left is the one that has the Quality set to 60, and has a file size of 42 KB (in its original dimensions, not in this comparison). The one on the right has its original, unchanged Quality, and has a file size of 329 KB (in its original dimensions, not in this comparison).
So, setting the Quality is a very, very important step. If an image happens to be visibly altered, you can increase the Quality, setting it to 70, for example.
If you use and like GIMP, you can support it by donating to the project.
That’s a wrap
Hope you found the post useful and comprehensive.
Feel free to share it with your friends!
If you have any questions or thoughts, please drop a comment, contact us or message us on Facebook.

This is the great tutorial. considering optimizing the images effectively for WordPress. Each and every byte should matter while creating images.