Adding a horizontal line separator in WordPress is quite a simple thing to do in both Classic Editor and Gutenberg.
In this tutorial, I’ll show you how to do it in both of them because I know some of you still use the Classic Editor plugin.
I’ll also show you how to customize them using some simple CSS.
Let’s get to it!
Add a Horizontal Line Separator in the Gutenberg WordPress Editor
You can also watch the video guide for this part.
Here’s what you need to do.
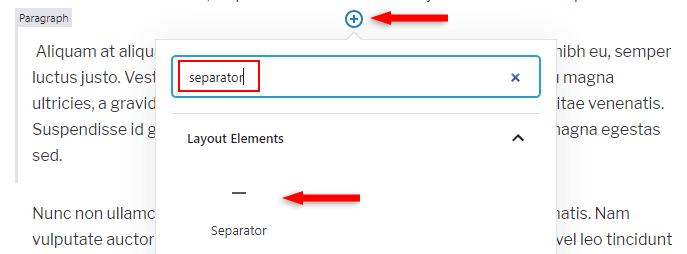
Step 1
Click on the + icon to add a new block, search for “separator”, then add the Separator block.
Step 2
A default horizontal line will appear, which is narrow.
You can change its style from the Styles section found in the right sidebar. The Separator block must be selected.
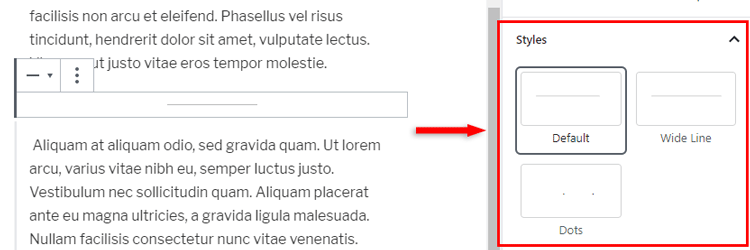
If you select Wide Line, it will make the separator stretch the whole width of the post or page.
If you select Dots, it will transform the horizontal line into 3 dots, which will be centered in your post or page.
Customizing the separator
Depending on what type of separator you choose, you’ll have 3 CSS classes: is-style-default, is-style-wide, is-style-dots.
Please note that the Dots style is different than the lines, therefore, the same CSS code won’t work for it. It needs different custom coding, which is kind of beyond the scope of this tutorial. It’s not that straightforward.
You’ll have to use one of them to customize the line separator.
You can do a bunch of customizations using CSS, but I’ll only show you a couple of them, which I think are the ones that most of you would want to change.
So, you can add some CSS code in WordPress like this:
.wp-block-separator.is-style-default{
background-color: #616b73;
height: 2px;
}
This code will change the horizontal line’s color and thickness.
You can change the hex color code (e.g. #E08A95) and height (e.g. 5px) to whatever you want. Here’s a tool to generate a hex color code.
Remember to change the second CSS class with .is-style-wide if you don’t use the default separator.
Also, if you can’t see the changes, clear your site and browser cache.
Adding a Horizontal Line Separator Using the WordPress Classic Editor
Adding a horizontal line using the Classic Editor is just as simple, but you don’t have additional styles.
It will just add a wide line across the whole width of the post or page.
Using the Visual editor
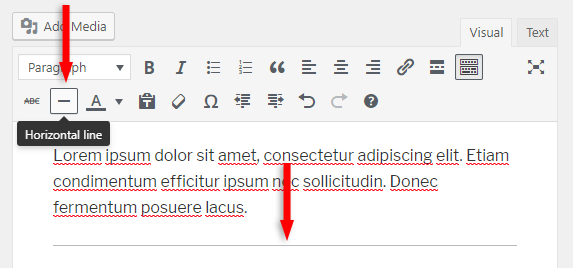
If you’re using the Visual editor, all you have to do is click on the Horizontal Line button in the toolbar.
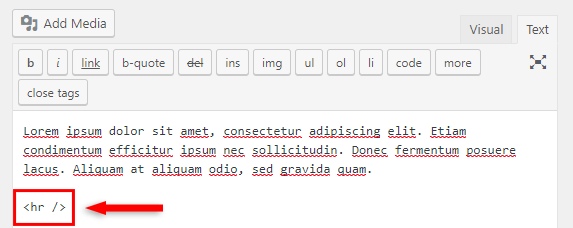
Using the Text editor
If you’re using the Text editor, then you’ll have to add the <hr /> HTML tag underneath a paragraph.
Customizing the horizontal line
Unlike the Gutenberg separator block, you don’t have a CSS selector to choose from.
You only need to add some custom CSS for the <hr /> HTML tag itself.
I’ll only show you a couple of customizations, which I think you’re the most interested in. You can add more if you know some CSS.
So, add some CSS code in WordPress like this:
hr {
background-color: #616b73;
height: 2px;
}
You can use this tool to generate a hex color code and replace the one above.
You can also change the height (thickness) value with whatever you want (e.g. 7px).
If the changes don’t take place, clear your site and browser cache.
That’s a Wrap
I hope you found this tutorial useful and comprehensive, and you managed to add a horizontal line separator in WordPress, as well as customize it.
If you have any questions or thoughts, drop a comment or send a message via contact or Facebook page.
You can also hit the follow button on Twitter and subscribe to the YouTube channel.
Don’t forget to share the post to help out others!

Leave A Comment