I’ve seen many people who bumped into this frustrating problem. It even happened to us one time, so we know how you feel.
I think Yoast’s XML sitemap is the best because, from what I’ve seen, the search engines’ indexing works a lot better with it.
Before I begin, let me tell you that the XML sitemap 404 error has nothing to do with Yoast’s plugin, it has to do with your theme’s coding, or with your theme + W3 Total Cache.

The first 3 easy solutions
1. Sometimes, all you need to do is to uncheck (disable) the XML sitemap, save the settings, then check (enable) it back and save the settings again.
Be careful after a Yoast or a theme update. Even if the XML sitemap works fine, after you update the plugin or the theme, the 404 error might appear. If this happens, apply the above solution, it should work.
2. If no. 1 doesn’t work, then deactivate and reactivate the plugin. See if that does the trick.
3. Reset the permalinks. Got to Admin (WordPress) -> Settings -> Permalinks, and just press Save Changes without modifying anything.
4. The fix for W3 Total Cache
Like I said above, sometimes the 404 page not found error can be caused by your theme + W3 Total Cache. This is what happened in our case. Yoast’s sitemap worked fine with our theme, but after we installed W3 Total Cache, it didn’t.
So, what you can do is to try this:
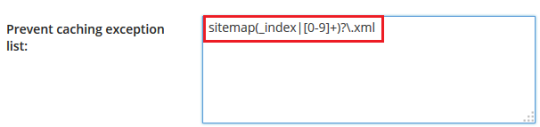
- Go to Performance -> Browser Cache -> Prevent caching exception list, and add this:
sitemap(_index|[0-9]+)?\.xml

- Under Prevent caching exception list, you’ll find 404 error exception list. Add:
sitemap(_index)?\.xml(\.gz)?and[a-z0-9_\-]+-sitemap([0-9]+)?\.xml(\.gz)?
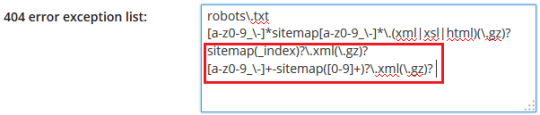
The first two lines are added there by default, so leave them.
5. The ultimate solution
This is a more complex solution, but it’s the most reliable. If the above solutions don’t work, this one has a very high chance of fixing Yoast’s XML sitemap 404 error.
Here’s the code you need to insert, depending on your server application:
For Apache
What you need to do here is to add some code to your .htaccess. You can modify your .htaccess directly from Yoast. Got to SEO -> Edit Files, and there it is under Robots.txt.
If you can’t edit it from there because maybe your security plugin is blocking that action, you need to do it via an FTP client or “File Manager” in your cPanel. The .htaccess file is in the public_html folder.
Add this code before the main WordPress rewrite rules:
# WordPress SEO - XML Sitemap Rewrite Fix
 RewriteEngine On
 RewriteBase /
 RewriteRule ^sitemap_index.xml$ /index.php?sitemap=1 [L]
 RewriteRule ^locations.kml$ /index.php?sitemap=wpseo_local_kml [L]
 RewriteRule ^geo_sitemap.xml$ /index.php?sitemap=geo [L]
 RewriteRule ^([^/]+?)-sitemap([0-9]+)?.xml$ /index.php?sitemap=$1&sitemap_n=$2 [L]
 RewriteRule ^([a-z]+)?-?sitemap.xsl$ /index.php?xsl=$1 [L]
 # END WordPress SEO - XML Sitemap Rewrite Fix
If you’re running WordPress in a subfolder, for example, /wordpress/, then you should use this code instead:
# WordPress SEO - XML Sitemap Rewrite Fix
 RewriteEngine On
 RewriteBase /wordpress/
 RewriteRule ^sitemap_index.xml$ /wordpress/index.php?sitemap=1 [L]
 RewriteRule ^([^/]+?)-sitemap([0-9]+)?.xml$ /wordpress/index.php?sitemap=$1&sitemap_n=$2 [L]
 # END WordPress SEO - XML Sitemap Rewrite Fix
For Nginx
Add this to your Nginx config:
#Yoast sitemap
 location ~ ([^/]*)sitemap(.*)\.x(m|s)l$ {
 ## this redirects sitemap.xml to /sitemap_index.xml
 rewrite ^/sitemap\.xml$ /sitemap_index.xml permanent;
 ## this makes the XML sitemaps work
 rewrite ^/([a-z]+)?-?sitemap\.xsl$ /index.php?xsl=$1 last;
 rewrite ^/sitemap_index\.xml$ /index.php?sitemap=1 last;
 rewrite ^/([^/]+?)-sitemap([0-9]+)?\.xml$ /index.php?sitemap=$1&sitemap_n=$2 last;
 ## The following lines are optional for the
 rewrite ^/news-sitemap\.xml$ /index.php?sitemap=wpseo_news last;
 rewrite ^/locations\.kml$ /index.php?sitemap=wpseo_local_kml last;
 rewrite ^/geo-sitemap\.xml$ /index.php?sitemap=wpseo_local last;
 rewrite ^/video-sitemap\.xsl$ /index.php?xsl=video last;
 }
Basically, you need to find the nginx.conf file and insert the code there. I don’t know if that file is in your public_html, like .htaccess is, because we never had a website on Nginx. If you don’t manage, you should contact your hosting support and ask them to add the code for you.
ATTENTION! There is a possibility that this solution (I’m referring to both Nginx and Apache codes) may cause errors for some people. I recommend asking your hosting support or someone with experience to do it for you.
That’s a wrap
Hope this post will help you solve Yoast’s XML sitemap 404 error.
Don’t forget to share and help other people out!

Thnak you bro
You’re most welcome!
Thank you! Number 4 was a big help.
Thanks! The NGINX mod did it for me.
That’s great!